You can set the scan range for the imaging device according to the lens attached.
Variable Scan Mapping (VSM)
Perform the setting using a recorded image of a white object with uniform brightness.
Caution
This setting is effective for vignette effect, however it may not be fully effective against distortion and reduction in ambient luminance. Perform the setting while taking into consideration the characteristic of the lens attached.
When a Micro Four Thirds lens is attached and the scan range specified exceeds the setting for Micro Four Thirds (“80% (MFT)”), the Micro Four Thirds lens may not perform optimally.
Setting VSM
Select [Main Menu]  [System] [Record Set] [VSM] and press the Set button (
  ).
).
[System] [Record Set] [VSM] and press the Set button ( ).The scan range selection screen is displayed.

Use a screen with vignette effect to make the setting operation simple.
Select the scan range using the  /
/  buttons.
/ buttons.The scan range when the size of the imaging device is set to “100% (Super35)” is displayed as percentage.
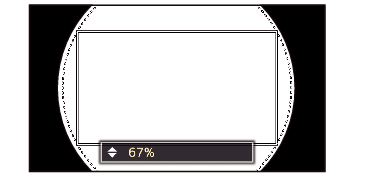
Square frame:
Scan range
Round dotted frame:
The image frame of the lens equivalent to the scan range (square frame).
Set in such a way that the vignette effect does not spread into the round dotted frame.
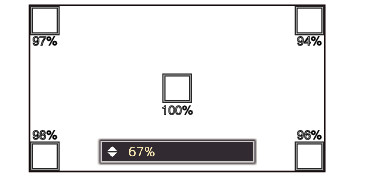
Press the [LOLUX/3] button to check the brightness.
The brightness confirmation screen is displayed, and the scan range specified is displayed in full screen size.
You can check the vignette effect through the brightness displayed at the four corners and the center of the brightness confirmation screen.
It is preferable to get 100 % brightness at the four corners with respect to the 100 % brightness at the center. However, depending on the characteristic of the lens attached, besides the vignette effect you may also not get 100 % brightness at the four corners.
Memo
When [Main Menu] [System] [Record Set] [Record Format] [System] is set to “SD”, and [SD Aspect] is set to “4:3”, the brightness confirmation screen is not displayed. The scan range specified is displayed in full screen and the item for setting the scan range appears as a scrolling list on the screen.
The values for the brightness at the four corners are estimates. We recommend using a measuring instrument to obtain accurate measurements.
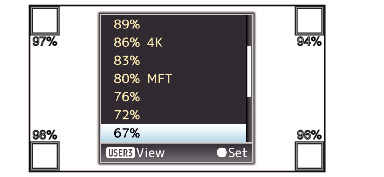
While the brightness is displayed, you can use the / buttons to change the scan range.
If you press the [LOLUX/3] button again, the item for setting the scan range appears as a scrolling list on the brightness confirmation screen.
Press the [LOLUX/3] button once again to return to the scan range selection screen (initial screen).
Press the Set button ( ).
).
![]()