-

-
Names of Parts
Names of Parts
Front
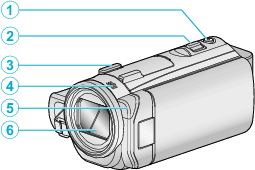
SNAPSHOT (Still Image Recording) Button
Takes a still image.
Zoom/Volume Lever
During shooting: Adjusts the shooting range.
During playback (index screen): Moves to the next or previous page.
During video playback: Adjusts the volume.
Shoe Adapter Mount
Enables an optional external microphone to be attached.
Stereo Microphone
Do not cover the microphone with your fingers during video recording.
Light
Turn on the light when shooting in dark places.
Lens/Lens Cover
Do not touch the lens and lens cover.
Do not cover the lens with your fingers during recording.
When the power is turned on, the lens cover opens automatically.
Rear
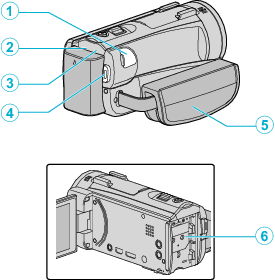
DC Connector
Connects to an AC adapter to charge the battery.
ACCESS (Access) Lamp
Lights up/blinks during recording or playback.
Do not remove the battery pack, AC adapter, or SD card.
POWER/CHARGE (Power/Charge) Lamp
Lights up: Power "ON"
Blinks: Charging in progress
Goes out: Charging finished
START/STOP (Video Recording) Button
Starts/stops video recording.
Grip Belt
Pass your hand through the grip belt to hold this unit firmly.
Battery Mount
Bottom
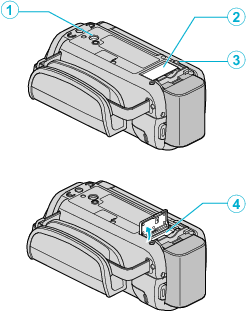
Tripod Mounting Hole
SD Card Cover
Battery Release Lever
SD Card Slot
Insert an optional SD card.
Interior
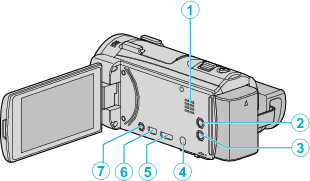
Speaker
Outputs audio sound during video playback.
 (Image Stabilizer) Button
The setting of image stabilizer changes with every press while video recording is stopped.
 (Power) Button
Press and hold to turn the power on/off while the LCD monitor is opened.
Microphone Connector
HDMI mini connector
Connects to TV using an HDMI mini cable.
USB Connector
Connects to computer using a USB cable.
AV/Headphones Connector
Connects to the AV connector of a TV, etc.
Connects to the headphone (sold separately).
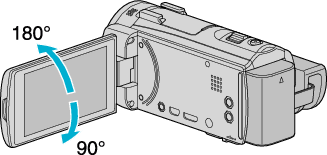
LCD Monitor
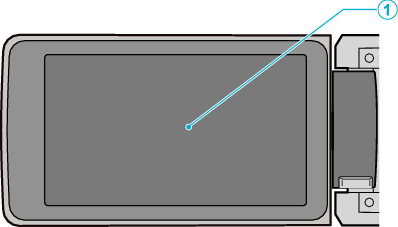
LCD Monitor
Turns the power on/off by opening and closing.
Enables self-portraits to be taken by rotating the monitor.
Caution
Do not press against the surface with force or subject it to strong impact.
Doing so may damage or break the screen.