Announcement and advertising images can be displayed across the whole screen.
Displaying Images on the Whole Screen (Full Screen Graphic Function)

Importing Images for Display to the Camera
Prepare the image for display.
JPEG (extension .jpg) and PNG (extension .png) formats are supported.
Copy the image file to the root directory of the SDHC/SDXC card.
Use an SDHC/SDXC card of a recordable specification in the current camera recording settings.
Up to 50 image files can be displayed.
The order of display by file name can be specified.
Memo
Add a two-digit number of 01 to 50 at the start of the file name. Files will be displayed in the order starting from those having the smallest number in the file name.
Example: When 01flower.png, 02car.jpg, 13red.png are imported, they are displayed in the order of 01flower.png  02car.jpg 13red.png.
Only alphanumeric characters and underscore (_) can be used for the third character onwards in the file name.
Enter not more than 31 characters for the file name.
Select [Main Menu] [Overlay Settings] [Full Screen Graphic].
[Overlay Settings] [Full Screen Graphic].Insert the SDHC/SDXC card where the image files are copied into the SD card slot A or B of the camera, and select [Import Graphic  ] or [Import Graphic
  ] to import.
] or [Import Graphic ] to import.Once import is performed, all images previously imported will be deleted.
To delete the imported image files, select [Main Menu] [Overlay Settings] [Full Screen Graphic] [Delete Graphic].
Memo
The total number of currently imported image files and the used capacity can be checked in [Main Menu] [Overlay Settings] [Full Screen Graphic] [Status]. This capacity may be bigger than the actual image file size.
The maximum import size is approx. 23 MB, after combining the capacity that can be checked in [Status] and the size of the imported SDP files.
Images that can be displayed are as follows:
|
|
Recording Resolution |
|
|---|---|---|
|
1920x1080 |
1280x720 |
|
|
Image Size |
960x540 |
640x360 |
|
File Size |
1MB and below |
|
JPEG:
Gradation: 8 bit
Pixel format: YCbCr or grayscale
Baseline JPEG
PNG:
Bit/Channel: 1, 2, 4, 8
Pixel format: Grayscale, Index, True color (RGB), grayscale with alpha, true color with alpha (RGBA)
Non-interlaced PNG
When images that cannot be displayed are imported to the camera, an error message “Unsupported Graphic Format” is displayed on the camera recorder while image display is in progress. Check in advance that images can be displayed as per expectation.
When the frame rate of the recording format is 60i or 50i, the image is not displayed in the area equivalent to the height of 12 lines at the bottommost of the screen.
Displaying Images
Display the image from the web screen for setting the overlay.
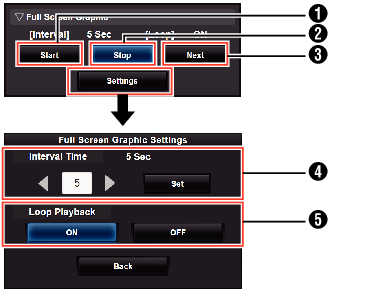
Start:
Starts the display of images.
Stop:
Stops the display of images.
Next:
Image in display:
Displays the next image.
Image not in display:
Starts displaying from the next image of the image at which the display stopped previously.
Depending on the status of the camera, it may take a while to display the next image after pressing the [Next] button.
Interval Time:
Sets the display time per image.
Depending on the status of the camera, it may take a while to display the next image after pressing the [Start] button. A time longer than the configured interval time may be displayed.
Loop Playback:
Select [ON] to return to the first image after the last image is displayed.
Memo
To display only one image continuously, set [Interval Time] to “0”.
When recording is performed together with live streaming or when there is a lot of information display on the LCD/VF screen, images may take more than 10 seconds to display. It is possible to reduce the time taken to display by lowering the resolution of the recording and live streaming or by pressing the [DISPLAY] button of the camera recorder several times to minimize information display on the LCD/VF screen.
To use only the Full Screen Graphic function without the overlay display, select [Main Menu] [Overlay Settings] [Type] and choose options other than “None”. Then, set the [Overlay] button on the web screen for controlling the overlay to Off.
When the format of the next image to be displayed is not supported during image display, “Unsupported Graphic Format” will be displayed on the camera recorder, and that image will not be displayed. Import images that support a displayable format.
![]()