
保存する |
DVDライターを準備する(CU-VD3の場合) |

USBケーブルとACアダプターを接続する
電源ボタン( ![]() )を2秒以上押して、電源を切ってください。
)を2秒以上押して、電源を切ってください。
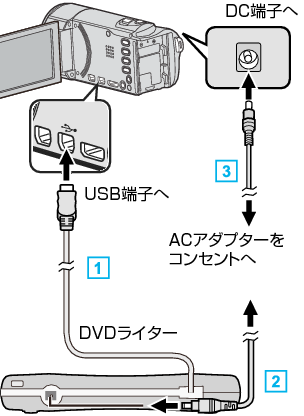

DVDライターのUSBケーブルを本機につなぐ

DVDライターのACアダプターをつなぐ

本機にACアダプターをつなぐ
ACアダプターを接続すると自動で電源が入ります。
本体の電源が入り、 "バックアップ"メニューが表示されます。
USBケーブルをつないでいる間は、 "バックアップ"メニューが表示されます。
DVDライターの取扱説明書もご覧ください。

新しいディスクを入れる

取り出しボタンを押して、ディスクトレイを開ける
トレイを完全に引き出して、新しいディスクを確実にはめ込む
ディスクトレイを「カチッ」と音がするまで押して閉じる
ご注意
- 機器を接続するときは、必ず電源を切ってください。
電源を入れたまま接続すると、感電や故障の原因になります。