-

- Recording
-
Taking Still Images in Auto Mode
Taking Still Images in Auto Mode
You can record without worrying about the setting details by using the ![]() Intelligent Auto mode.
Intelligent Auto mode.
Memo
Depending on the subject and shooting conditions, recording may not be performed properly even in the Intelligent Auto mode.
Start recording after adjusting the focus

Available only when “SHUTTER MODE” is set to “RECORD ONE SHOT”.
Indications During Still Image Recording
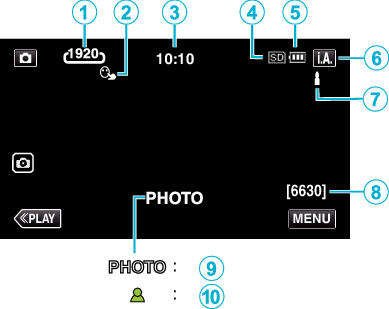
Some displays disappear after approximately 3 seconds.
Use the  button to change the displays.
Display Icon |
Description |
|
|---|---|---|
|
|
Image Size |
Displays the icon of the image size. The size of still images can be changed. |
|
|
TOUCH PRIORITY AE/AF |
Displays the setting of “TOUCH PRIORITY AE/AF”. |
|
|
Time |
Displays the current time. |
|
|
Recording media |
Displays the icon of the media where still images are recorded to. |
|
|
Battery Indicator |
Displays the approximate remaining battery power during use. |
|
|
Recording Mode |
Displays the current recording mode of |
|
|
Setting Scenes of Intelligent Auto |
Displays scenes detected automatically in the Intelligent Auto function. Multiple scenes may be detected. |
|
|
Remaining Number of Shots |
Displays the remaining number of shots for still image recording. |
|
|
Recording in Progress |
“PHOTO” appears when a still image is being captured. |
|
|
Focus |
Lights up in green when focused. |
Scenes of Intelligent Auto
Display Icon |
Description |
|---|---|
|
|
Captures one’s skin beautifully. |
|
|
Allows people to be captured naturally. |
|
|
Record a group of people with the most suitable settings. |
|
|
Record the smiling face clearly. |
|
|
Records while focusing on a near object. |
|
|
Focuses at a far distance and captures a sharp image with vivid colors. |
|
|
Records in dark places with minimal noise in the overall image. |
|
|
Allows night scenes to be captured accurately with minimal noise in the overall image. |
|
|
Prevents colors from fading even when recording in a bright environment, such as snowfield and beaches. |
|
|
Prevents colors from fading when recording a subject in a spotlight. |
|
|
Reproduces the green color of trees vividly. |
|
|
Reproduces the colors of sunset naturally. |
|
|
Adjusts settings so that the subject does not appear too dark due to backlight. |
|
|
Records while emphasizing the brightness of the colors. |
|
|
Reproduces the natural colors of the outdoors during the day. |
|
|
Reproduces the natural colors of the indoors in a cold-color illumination. |
|
|
Reproduces the natural colors of the indoors in a warm-color illumination. |
|
|
Selects the most suitable settings for handheld shooting. |
|
|
Selects the most suitable settings when a tripod is used for shooting. |
Memo
Scenes can be detected according to the shooting conditions and automatically adjusted in Intelligent Auto mode.
Multiple scenes may be detected depending on the recording conditions.
Some functions may not work properly depending on the shooting conditions.
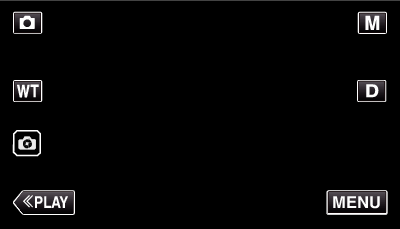
Operation Buttons for Still Image Recording
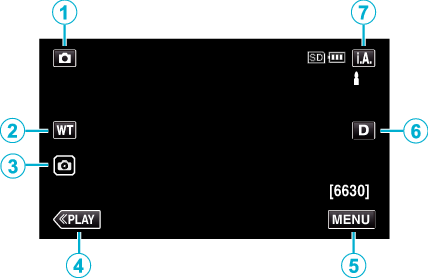
Operation Buttons |
Description |
|
|---|---|---|
|
|
Video/Still Image Mode |
Switches between video and still image modes. |
|
|
WT Zoom |
Allows the same functions as the zoom lever to be performed. |
|
|
Still Image Recording |
Allows you to take still images using the touch panel. Pressing and holding the button allows you to adjust the focus before shooting. |
|
|
Playback Mode |
Switches to the playback mode. |
|
|
MENU |
Displays the various menus of still image recording. |
|
|
Display Button |
Switches the display between full ( Simple display: Some displays disappear automatically when the screen is not operated. Full display: Displays everything. The display button changes from When the power is turned off, simple display ( |
|
|
Recording Mode |
Switches between the |
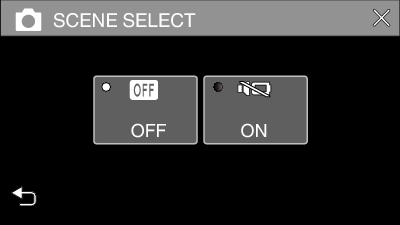
Using the Silent Mode
When the Silent mode is used, the LCD monitor darkens and operation sounds will not be output. Use this mode to record quietly in dark places such as during a performance.
![]() appears when “SILENT MODE” is set to “ON”.
appears when “SILENT MODE” is set to “ON”.
To mute only the operating sound, set “OPERATION SOUND” in the menu to “OFF” instead of using the silent mode.
Operating procedure
The top menu appears.
_UJDCILutuwlqug.png)
Useful Settings for Recording
When “AUTO POWER OFF” is set to “ON”, this unit turns itself off automatically to conserve power when it is not operated for 5 minutes. (When using the AC adapter, this unit goes into standby mode.)
When “TOUCH PRIORITY AE/AF” is set to “FACE TRACKING”, this unit detects faces and automatically adjusts its brightness and focus to record the faces more clearly.
Caution
Do not expose the lens to direct sunlight.
While this unit may be used with the LCD monitor reversed and closed, the temperature rises more easily. Leave the LCD monitor open when using this unit for long periods of time, or in places exposed to direct sunlight or high temperatures.
The power may turn off to protect the circuit if the temperature of this unit rises too much.
Do not remove the AC adapter or SD card when the POWER/ACCESS lamp is lighted. The recorded data may become unreadable.
This unit is a microcomputer-controlled device. Electrostatic discharge, external noise and interference (from a TV, a radio, etc.) might prevent it from functioning properly. In such a case, close the monitor screen to turn off the power and remove the AC adapter, then press the Reset button to reset this unit.
Memo
Before recording an important scene, it is recommended to conduct a trial recording.
Depending on the shooting conditions, the four corners of the screen may appear dark, but this is not a malfunction. In this case, change the shooting conditions by moving the zoom lever, etc.



 ) and simple (