Changing Scene Select
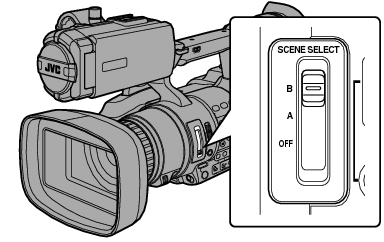
Use the [SCENE SELECT] switch to change camera settings easily and promptly according to specific scenarios.
Set the [SCENE SELECT] switch to “A” or “B” to enter the Scene Select mode. This allows the camera recorder to enter a preset shooting mode.

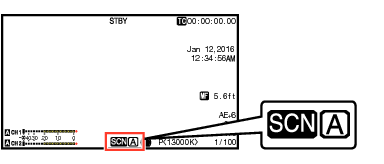
When the camera recorder is in the Scene Select mode, “SCN A” or “SCN B” appears on the screen.

Setting Scene Select
You can set different shooting modes for “A” and “B” of the [SCENE SELECT] switch.
The camera recorder switches to the desired set position (“A” or “B”).
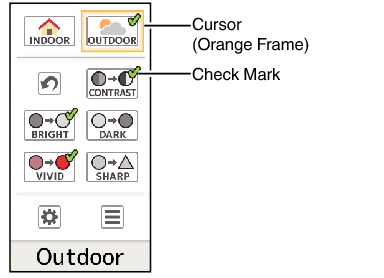
The Scene Select setting menu appears.

Use the cross-shaped button ( 


 ) to move the orange cursor. Select icons for the shooting mode and press the Set button (
  ).
).
Icons being selected are indicated by a check mark (  ). Press the Set button again to remove the check mark.
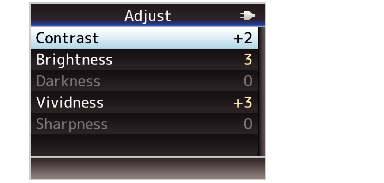
When a check mark appears beside an icon, select ![]() (Adjust) and press the Set button to display the Adjust screen. You can adjust the selected shooting mode.
(Adjust) and press the Set button to display the Adjust screen. You can adjust the selected shooting mode.
Returns to the normal screen.
The Scene Select mode operates regardless of the [FULL AUTO ON/OFF] switch setting. However, Full Auto mode will be “ON”.
The status of the selected shooting mode can be saved in both “A” and “B” of the [SCENE SELECT] switch.
If a check mark does not appear for “Bright”, “Dark”, “Hi Contrast”, “Vivid” or “Sharp”, the Adjust screen will not appear.
When the Scene Select setting menu is displayed, changing the [SCENE SELECT] switch to “OFF” will close the Scene Select setting menu and return to the normal screen.
When the [SCENE SELECT] switch is set to “A” or “B”, items in [Main Menu]  [Camera Function] cannot be set.
Settings for [AE Level] are disabled during the Scene Select mode.
Settings for [Camera Process] are disabled during the Scene Select mode.
List of Shooting Modes (Icon)
|
Icon |
Description |
|---|---|
|
Indoor (*1) |
Select for indoor shooting. |
|
Outdoor (*1) |
Select for outdoor shooting. |
|
(Reset) |
Returns all current setting values for the [SCENE SELECT] switch (“A” or “B”) to default. |
|
Hi Contrast |
Select to add contrast and differentiate brightness and darkness. |
|
Bright (*2) |
Select when the background is bright and the subject appears dark against the backlight. Adjust when the subject becomes darker than necessary in Auto Iris mode. |
|
Dark (*2) |
Select when the background is dark and the subject is too bright. Adjust when the subject becomes brighter than necessary in Auto Iris mode. |
|
Vivid |
Select for shooting vivid and colorful subjects. |
|
Sharp |
Select to emphasize the contour of the subject. |
|
(Adjust) |
Displays the adjustment screen. Details for each setting value can be configured. |
|
(Menu) |
Displays the menu screen. |
“Indoor” and “Outdoor” cannot be selected at the same time.
“Bright” and “Dark” cannot be selected at the same time.
Detailed Settings for Shooting Mode

Select the item to adjust using the cross-shaped button ( 
 ), and press the Set button (
  ).
).
Change the setting value using the cross-shaped button ( 
 ), and press the Set button (
  ).
).
The settable items and their values are as follows.
Contrast:
-3 to +3 (Default value: +2)
Brightness:
0 to 6 (Default value: 3)
Darkness:
0 to 6 (Default value: 3)
Vividness:
-5 to +5 (Default value: +3)
Sharpness:
-3 to +3 (Default value: +2)
The default value is the one with the check mark beside the icon in the Scene Select setting menu.
For items without a check mark beside the icons in the Scene Select setting menu, the setting values are fixed at “0” and cannot be changed.
 ) or [CANCEL] button.
Returns to the Scene Select setting menu.
Press the [MENU/THUMB] button to return to the normal screen.
When the Adjust screen is displayed, changing the [SCENE SELECT] switch to “OFF” will close the Adjust screen and return to the normal screen.
