Side Control Panel
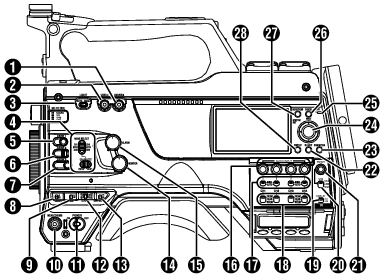
[ONLINE/5] Button
Switches live streaming between ON/OFF.
You can also use it as a user button by assigning a specific feature in the menu setting to this button. Initial setting: Live streaming
[USER4] Button
It can be assigned with a specific menu function.
[LIGHT] Switch
For selecting the operation mode of the video light connected to the [LIGHT] terminal.
AUTO:
The video light lights up only during recording when the video light is turned on.
MANUAL:
The video light lights up or goes out when the video light is turned on or off.
[MONI SELECT] Switch/[CH SELECT] Switch
For configuring the audio monitor (speaker/headphone) output with the combined use of two switches.
[USER1] Button
It can be assigned with a specific menu function.
[USER2] Switch
It can be assigned with a specific menu function.
Even when the function assigned to the [USER2] switch is assigned to another user button at the same time, only the [USER2] switch is enabled.
[USER3] Button
It can be assigned with a specific menu function.
[USER0] Switch
It can be assigned with a specific menu function.
[GAIN H/M/L] Switch
For selecting the gain sensitivity level.
[MENU/THUMB] Button
Displays the menu screen during Camera mode.
Switches between [Main Menu] and [Favorites Menu] when the [MENU/THUMB] button is pressed and held down while the menu screen is displayed.
Displays the menu screen when the button is pressed during thumbnail display in the Media mode.
Stops playback and displays the thumbnail screen when the button is pressed during playback screen display in the Media mode.
[POWER ON/OFF] Switch
Turns ON/OFF the power.
When the power is turning OFF, “P.OFF” appears on the LCD monitor and viewfinder.
Wait for 5 seconds or more to turn on the power again.
[OUTPUT] Switch
For configuring the output signal when in the Camera mode.
CAM/AUTO KNEE ON: Turns “ON” Auto Knee.
CAM/AUTO KNEE OFF: Turns “OFF” Auto Knee.
BARS/AUTO KNEE OFF: Outputs a color bar.
[WHT.BAL PRST/A/B] Switch
For switching the white balance.
[MONITOR] Volume Adjustment Knob
For adjusting the volume of the audio monitor (speaker/headphone).
[ALARM] Volume Adjustment Knob
For adjusting the warning alarm volume of the audio monitor (speaker/headphone).
Whether the sound is to be muted or output when it is at the minimum level can be configured in [Min. ALARM Level].
[AUDIO INPUT CH1/2/3/4] Recording Level Adjustment Knob
For adjusting the recording level manually when the [MANUAL/AUTO] selection switch is set to “MANUAL”.
[AUDIO CH1/2/3/4]-[MANUAL/AUTO] Selection Switch
For configuring the recording level of each channel to [MANUAL/AUTO].
[AUDIO CH1/2/3/4]-[FRONT/REAR/WIRELESS] Selection Switch
For selecting the recording input path [FRONT/REAR/WIRELESS] for each channel.
[TC DISPLAY] TC/UB Display Switch
Switches the display between time code and user’s bit.
[TC GEN] Time Code Generator Switch
For configuring the run mode of the time code.
F-RUN:
The time code operates in the run mode at all times. Synchronizes with the external time code when an external time code generator is connected.
R-RUN:
The time code operates in the run mode while recording is in progress. When the SD card is replaced, recording continues from where it last stopped using the previous card.
REGEN:
The time code operates in the run mode while recording is in progress. When the SD card is replaced, recording starts from the last time code recorded on the current SD card.
[TC PRESET] Button
When the [TC GEN] switch is set to “F-RUN” or “R-RUN”, this camera recorder enters or exits Preset mode when this button is pressed.
Upon entering Preset mode, an enlarged display appears on the LCD monitor. Use the cross-shaped button to move the cursor and select a value. Next, press the [STATUS/SET] button to preset the time code and the screen returns to the original display.
The UB mode is enabled only when [TC/UB]  [UB Mode] is set to “Preset”.
[B.LIGHT] Button
Sets the LCD monitor backlight.
Pressing the button each time switches the mode as follows:
Dark Normal Bright Off Dark
[CAM/MEDIA] Button
Switches between the Camera mode and Media mode.
Cross-shaped ( 


 )/[STATUS/SET] Button (
  )
)
For operating the menu and cursor and for confirming a setting, as well as for configuring the settings for time code and user’s bit.
When in the Camera mode (menu is not displayed), pressing the [STATUS/SET] button displays the status screen.
When a function is assigned to the cross-shaped button, it functions as a user button.
[ACCESS] Lamp
The indicator lights up in green when the recording media is being accessed.
Regardless of whether a recording media has been inserted, the access lamp will light up for about 5 seconds when the power is turned on.
[CANCEL/RESET] Button
Cancels various settings and stops playback.
Performs reset when the TC mode or UB mode is being configured during enlarged display on the LCD monitor.
[MENU/THUMB] Button
Displays the menu screen during Camera mode.
Switches between [Main Menu] and [Favorites Menu] when the [MENU/THUMB] button is pressed and held down while the menu screen is displayed.
Displays the menu screen when the button is pressed during thumbnail display in the Media mode.
Stops playback and displays the thumbnail screen when the button is pressed during playback screen display in the Media mode.
[DISPLAY] Button
Press the [DISPLAY] button to switch to the display screen during normal screen display (when the menu screen is not displayed).
Switches between [Main Menu] and [Favorites Menu] when the [DISPLAY] button is pressed while the menu screen is displayed.
![]()