Adjusting Movies for Increased Expressiveness (Multiple Pixel Control)
TOPThe new image-processing algorithm developed by JVC helps to create a natural impression that is sharper at areas in focus, and softer at areas that are not in focus, enabling you to enjoy highly expressive 4K images with a greater sense of depth.
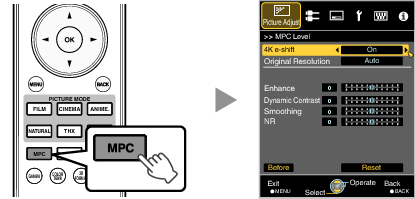
You can also perform setting from “Picture Adjust” ![]() “MPC Level” in the menu.
“MPC Level” in the menu.
The factory setting varies with the “Picture Mode”.
|
Item |
Setting |
Description |
|---|---|---|
|
4K e-shift |
On (4K)/Off (2K) |
Switches the display resolution. |
|
Original Resolution |
Auto/4K/1080p |
For selecting a resolution for the content you are viewing. |
|
Enhance* |
0 to 10 |
Enhances the sharpness of the image. |
|
Dynamic Contrast |
0 to 10 |
Enhances the contrast of the image. |
|
Smoothing |
0 to 10 |
Enhances the blurriness of the image for a softer effect. |
|
NR |
0 to 10 |
For reducing the noise of the video image. |
In the case of 4K 50/60p and other input signals, the respective setting values are saved.
In the default “Original Resolution” setting (“Auto”), the resolution is set automatically.
By increasing the setting range, you can expect enhanced effects.
Images are displayed in the original resolution (2K) when “4K e-shift” is set to “Off”.
“Original Resolution”, “Enhance”, “Dynamic Contrast”, and “NR” can be adjusted even when “4K e-shift” is set to “Off”.
“4K e-shift” is fixed at “On” during 4K signal input.
“Original Resolution” is fixed at “Auto” during 4K 50/60p signal input. “Dynamic Contrast”, “Smoothing” and “NR” are grayed out.
“4K e-shift” is fixed at “Off” during 3D signal input.
Pressing the [HIDE] button on the remote control enables you to toggle between the states before adjustment and during adjustment.
Pressing the [P.ANALYZER] button on the remote control displays the analysis screen. The operation varies with the state of the OSD.
The analysis screen is not displayed during 4K 50/60p signal input.
The frequency components of the input image are displayed.

The frequency components are distinguished using different colors.
When setting the “Original Resolution” manually, select “4K” if high-frequency components constitute the majority, and a lower resolution if there are more low-frequency components.

You can also perform setting from “Picture Adjust” ![]() “MPC Level” in the menu.
“MPC Level” in the menu.
With “Enhance” selected, pressing the [P.ANALYZER] button displays the analysis screen and the area where the “Enhance” effect is applied appears in “cyan” color.
With “Dynamic Contrast” selected, pressing the [P.ANALYZER] button displays the analysis screen and the area where the “Dynamic Contrast” effect is applied appears in “yellow” color.
With “Smoothing” and “NR” selected, pressing the [P.ANALYZER] button displays the analysis screen and the area where the “Smoothing” and “NR” effects are applied appears in “magenta” color.
You can make adjustments with the analysis screen displayed.
Increasing the value enhances the effect and the color displayed is darker.