Recording |
Taking Videos in Auto Mode |
You can record without worrying about the setting details by using the auto mode.
- 1
- 2
- 3
- 4

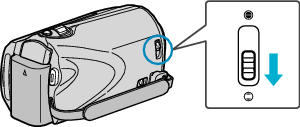
Open the lens cover.


Open the LCD monitor and select the video mode.

The video mode icon appears.

Check if the recording mode is Auto.

If the mode is Manual, touch the ![]() /
/ ![]() button.
button.
The mode changes between Auto and Manual with every touch.

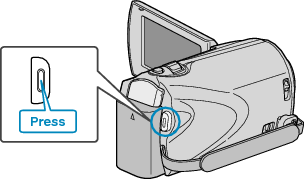
Start recording.

Press again to stop.
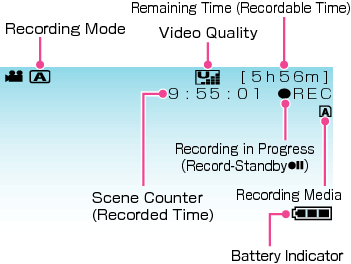
Indications During Video Recording

| Display Icon | Description |
|---|---|
| Recording Mode |
Press the |
| Video Quality |
Displays the icon of the “VIDEO QUALITY” setting selected in the recording menu. |
| Remaining Time (Recordable Time) |
Displays the remaining time for video recording. |
| Recording in Progress |
Appears when video recording is in progress. |
| Record-Standby |
Appears when video recording is paused. |
| Scene Counter (Recorded Time) |
Displays the elapsed time of the video that is currently being recorded. |
| Recording Media |
Displays the icon of the media where videos are recorded to. |
| Battery Indicator |
Displays the approximate remaining battery power. |
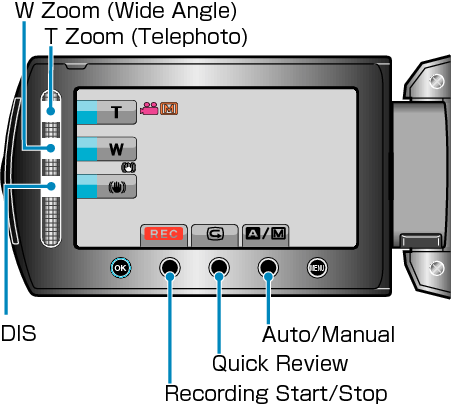
Operation Buttons for Video Recording

| Operation Button | Description |
|---|---|
| T/W Zoom |
Allows the same functions as the zoom lever to be performed. |
| DIS |
Sets whether to reduce camera shake. |
| Recording Start/Stop |
Functions as the START/STOP button. |
| Quick Review |
Enables the most recently captured video to be viewed. |
| Auto/Manual |
Switches the recording mode between Auto and Manual. |
Memo
- The slider operation button cannot be used when the LCD monitor is flipped.
- The zoom appears when the slider is touched.
Useful Settings for Recording
The aspect ratio for recording can be switched between 16:9 and 4:3.
Videos can be found easily during playback by categorizing them when recording.
When “QUICK RESTART” is set to “ON”, this unit turns on immediately if you open the LCD monitor within 5 minutes after the power is turned off by closing the monitor.
When “AUTO POWER OFF” is set to “ON”, this unit turns itself off automatically to conserve power when it is not operated for 5 minutes. (only when using the battery pack)
Caution
- Do not expose the lens to direct sunlight.
- Do not use this unit in the rain, snow, or places with high humidity like the bathroom.
- Do not use this unit in places subject to excessive humidity or dust, as well as places exposed to steam or smoke directly.
- The access lamp lights up when video recording is in progress. Do not remove the battery pack, AC adapter, or SD card when the lamp is lighted.
- Make a backup of important recorded data
It is recommended to copy your important recorded data to a DVD or other recording media for storage. JVC will not be responsible for any lost data.
Memo
- Before recording an important scene, it is recommended to conduct a trial recording.
- Check the remaining recording time in the media before you start shooting. If there is not enough space, move (copy) the data to a PC or disc.
- Do not forget to make copies after recording!
- Recording stops automatically as it cannot be performed for 12 or more consecutive hours according to specifications.
(It may take some time to resume recording.) - For long recordings, the file is split into two or more files if the size exceeds 4 GB.
- You can connect this unit to the AC adapter to record for long hours indoors.
