Sets the dynamic DNS information of the obtained account on the camera.
-

- Using Wi-Fi (GC-PX100)
- Changing the Settings
-
Setting Dynamic DNS on this Camera (OUTDOOR MONITORING)
- Wi-Fi Capabilities
- Operating environment
- Precautions on Using Wi-Fi
- Image Monitoring via Direct Connection (DIRECT MONITORING)
- Image Monitoring via an Access Point at Home (INDOOR MONITORING)
- Image Monitoring via the Internet (OUTDOOR MONITORING)
- Sending Still Images via E-mail upon Detection of Face or Movement (DETECT/MAIL)
- Record and Send Videos via E-mail (VIDEO MAIL)
- Recording the Location Information
- Changing the Settings
- Setting the Password (DIRECT MONITORING/INDOOR MONITORING/OUTDOOR MONITORING)
- Setting the Enforced Group Owner (DIRECT MONITORING)
- Changing the HTTP Port (DIRECT MONITORING/INDOOR MONITORING/OUTDOOR MONITORING)
- Setting the Score Display Record (DIRECT MONITORING)
- Setting the UPnP of this Camera (OUTDOOR MONITORING)
- Obtaining a Dynamic DNS (DDNS) Account
- Setting Dynamic DNS on this Camera (OUTDOOR MONITORING)
- Setting the Sender’s E-mail Address of the Camera
- Registering the Recipient’s E-mail Address of the Camera
- Setting the Detection Method of this Camera (DETECT/MAIL SETTING)
- Setting the Detection Interval of this Camera (DETECT/MAIL SETTING)
- Setting Self Recording on this Camera (DETECT/MAIL SETTING)
- Registering the Access Points of the Camera to Connect (ACCESS POINTS)
- Checking the MAC Address of this Camera
- Protecting the Network Settings with a Password
- Initializing the Wi-Fi Settings
- Using Smartphone Applications
- Using Tablet Applications
- Using the Wi-Fi Function from a Web Browser
- Troubleshooting
- Wi-Fi Specifications
Setting Dynamic DNS on this Camera ( OUTDOOR MONITORING )
Tap “MENU”.
(Operation on this camera)
_IZYUILvdsdgwox.png)
The top menu appears.
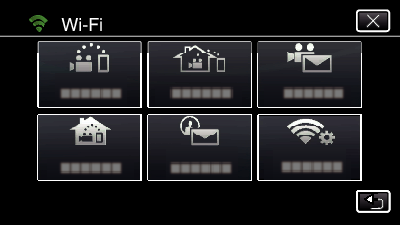
Tap the “Wi-Fi” (  ) icon.
(Operation on this camera)
_UJDCILkrscevgk.png)
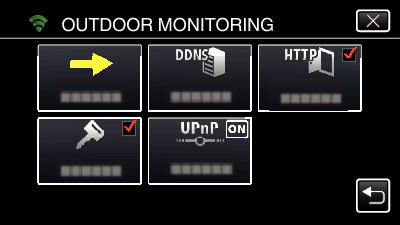
Tap “OUTDOOR MONITORING” (  ).
).
(Operation on this camera)

Tap “DDNS SETTING”.
(Operation on this camera)

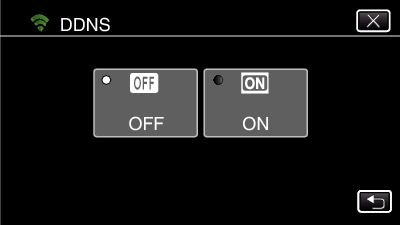
Tap “DDNS”, then tap “ON”.
(Operation on this camera)

Tap “OK”.
(Operation on this camera)

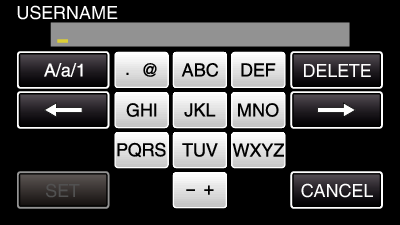
Enter the DDNS settings (username/password).
(Operation on this camera)

Tap on the on-screen keyboard to enter characters. The character changes with every tap.
“ABC”, for example, enter “A” by tapping once, “B” by tapping twice, or “C” by tapping 3 times.
Tap “DELETE” to delete a character.
Tap “CANCEL” to exit.
Tap “A/a/1” to select character input type from upper case letter, lower case letter, and number.
Tap ![]() or
or ![]() to move one space to the left or right.
to move one space to the left or right.
After setting, tap “SET”.
Memo
Only the JVC dynamic DNS service can be set on this camera.
