JVC

Global

HD MEMORY CAMERA GZ-GX1
  • Select and Print Page
0115-0100

  • Site Map
  • Index

Beginner’s Guide

Useful Shooting Techniques

Copying Your Files

Using Wi-Fi

  • Getting Started
  • Recording
  • Playback
  • Editing
  • Copying
  • Menu Settings
  • Back to Main

  • Verifying the Accessories
  • Charging the Battery Pack
  • Grip Adjustment
  • Inserting an SD Card
  • Using the Touch Screen
  • Clock Setting
  • Changing the Display Language
  • Holding this Unit
  • Tripod Mounting
  • Using the Remote Control
  • Attaching Headphones
  • Attaching an External Microphone
  • Using this Unit Overseas
  • Optional Accessories
  • Taking Videos in Auto Mode
  • Taking Still Images in Auto Mode
  • Manual Recording
  • Recording with Effects
  • Capturing Subjects Clearly (TOUCH PRIORITY AE/AF)
  • Registering Human Face Personal Authentication Information
  • Reducing Camera Shake
  • Slow-motion (High-speed) Recording
  • Recording at Intervals (TIME-LAPSE RECORDING)
  • Recording Automatically by Sensing Movements (AUTO REC)
  • Taking Group Shots (Self-timer)
  • Recording Videos with Date and Time
  • Checking the Remaining Recording Time
  • Playing Back Videos
  • Playing Back Still Images
  • Searching for a Specific Video/Still Image by Date
  • Connecting to and Viewing on TV
  • Playing Back Playlists
  • Playing Back a DVD or Blu-ray Disc Created on this Unit
  • Deleting Unwanted Files
  • Protecting Files
  • Capturing a Still Image in the Video During Playback
  • Capturing a Required Part in the Video (TRIMMING)
  • Capturing Videos for Uploading to YouTube
  • Creating Playlists from the Recorded Videos
  • Creating Discs with a DVD Writer
  • Creating Discs with a BD Writer (External Blu-ray Drive)
  • Creating a Disc Using a Connected Blu-ray Recorder
  • Dubbing Files to a Disc by Connecting to a DVD Recorder
  • Dubbing Files to a VHS Tape by Connecting to a VCR
  • Using a USB External Hard Disk Drive
  • Copying to Windows PC
  • Copying to Mac Computer
  • Operating the Menu
  • Recording Menu (Video)
  • Recording Menu (Still Image)
  • Playback Menu (Video)
  • Playback Menu (Still Image)
  • Common Menu
Main Page > Getting Started > Using this Unit Overseas > Charging the Battery Pack Overseas

Getting Started

Charging the Battery Pack Overseas

  • Verifying the Accessories
  • Charging the Battery Pack
  • Grip Adjustment
  • Inserting an SD Card
  • Types of Usable SD Card
  • Using the Touch Screen
  • Names of Buttons and Functions on the LCD Monitor
  • Clock Setting
  • Resetting the Clock
  • Changing the Display Language
  • Holding this Unit
  • Tripod Mounting
  • Using the Remote Control
  • Attaching Headphones
  • Attaching an External Microphone
  • Using this Unit Overseas
  • Charging the Battery Pack Overseas
  • Setting the Clock to Local Time when Traveling
  • Setting Daylight Saving Time
  • Optional Accessories
  • Names of Parts
  • Indications on the LCD monitor
  • Troubleshooting
  • Maintenance
  • Specifications

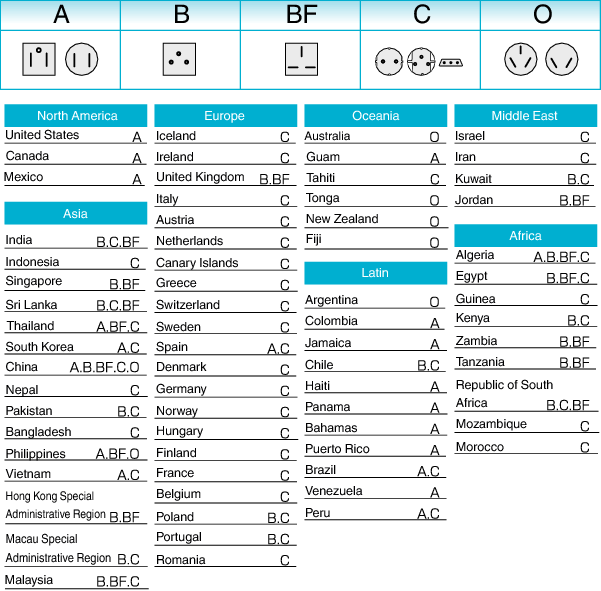
The shape of the power outlet varies according to countries and regions.
To charge the battery pack, you need a converter plug that matches the shape of the outlet.

plug
Back to Main
Return to Top
JVC Global TOP (English Only) JVC Worldwide Sites (English Only) Contact & Support (English Only)
Terms of Use
© 2012 JVCKENWOOD Corporation