
Playback |
Playing Back Videos |
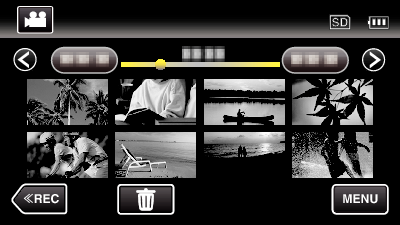
You can select and play back the recorded videos from an index screen (thumbnail display).
- 1
- 2
- 3

Open the LCD monitor.
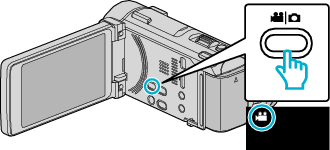
Check if the recording mode is ![]() .
.
If the mode is ![]() still image, tap
still image, tap ![]() on the recording screen to display the mode switching screen.
on the recording screen to display the mode switching screen.
Tap ![]() to switch the mode to video. (You can also use the
to switch the mode to video. (You can also use the ![]() /
/ ![]() button on this unit.)
button on this unit.)

Tap “<<PLAY” to select the playback mode.
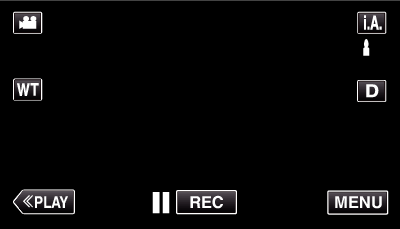

Tap on the file to start playback.
Tap ![]() to pause.
to pause.
Tap ![]() to return to the index screen.
to return to the index screen.
![]() appears on the last image played back.
appears on the last image played back.
Images recorded in 60p mode and 60i mode are displayed on the index screen separately.
To view the images recorded in 60p mode, set “SYSTEM SELECT” in the video recording menu to “60p” before selecting the playback mode. In cases such as during Digest Playback or when playing back/editing a playlist, set “SYSTEM SELECT” in the same way before operating.
To view the images recorded in 60i mode, set “SYSTEM SELECT” in the video recording menu to “60i” before selecting the playback mode. In cases such as during Digest Playback or when playing back/editing a playlist, set “SYSTEM SELECT” in the same way before operating.
Operation Buttons for Video Playback
During Index Screen Display
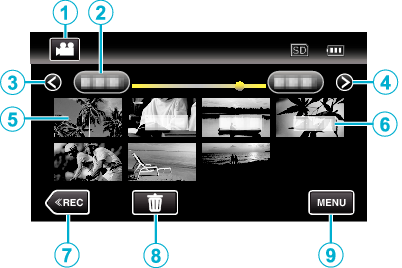
| Display | Description | |
|---|---|---|
 |
Video/Still Image Mode |
Switches between video and still image modes. |
 |
Date |
Moves to the previous/next date |
 |
< |
Displays the previous index screen (thumbnail display) You can perform the same operation with the zoom lever. |
 |
> |
Displays the next index screen (thumbnail display) You can perform the same operation with the zoom lever. |
 |
Thumbnail (File) |
Tap on thumbnail - Starts playback |
 |
Recording Date |
Recording date (only displayed on the first file of each date) |
 |
<<REC |
Switches to the recording mode. |
 |
|
Displays the index screen (thumbnail display) to perform deletion |
 |
MENU |
Displays the menu screen |
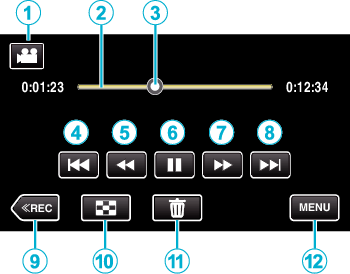
During Video Playback
| Display | Description | |
|---|---|---|
| |
Video/Still Image Mode |
Switches between video and still image modes. |
| |
Timeline Bar |
Tap on a random position - Moves to the tapped position Tap on a random position - Moves to the tapped position |
| |
Pointer |
Displays the current estimated playback position within the scene |
| |
|
Returns to the beginning of the scene Returns to the previous scene if tapped at the beginning of a scene. You can perform the same operation with the zoom lever. |
| |
|
Reverse search (speed increases with each tap) |
| |
|
Reverse slow-motion / Press and hold to start reverse slow playback |
| |
|
Playback/pause |
| |
|
Forward search (speed increases with each tap) |
| |
|
Forward slow-motion / Press and hold to start slow playback |
| |
|
Advances to the next scene You can perform the same operation with the zoom lever. |
| |
<<REC |
Switches to the recording mode. |
 |
|
Stop (returns to index screen) |
 |
|
Deletes the currently displayed video. |
 |
MENU |
Displays the menu screen |
Memo
- Tap or drag on the operation area of the touch screen.
- Operations buttons on the touch screen disappear if the unit is not operated for about 5 seconds. Tap on the screen to display the operation buttons again.
- You can search for a specific file by the recording date.
- The recording date and time can be displayed on the screen during playback.

Caution
- Make a backup of important recorded data.
It is recommended to copy your important recorded data to a DVD or other recording media for storage. - This unit is a microcomputer-controlled device. Electrostatic discharge, external noise and interference (from a TV, a radio, etc.) might prevent it from functioning properly. In such a case, turn off the power, then remove the AC adapter and battery pack. This unit will be reset.