Fine-tuning to the Preferred Gamma Setting
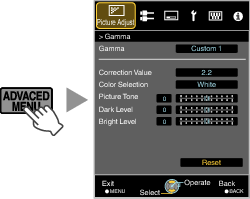
TOPYou can perform fine adjustments based on the selected gamma adjustment setting.
You can also perform setting from “Picture Adjust” ![]() “Gamma” in the menu.
“Gamma” in the menu.
|
Item |
Description |
Setting |
|---|---|---|
|
Color Selection |
Select “Color Selection”, and select the color to adjust |
White/Red/Green/Blue |
|
Picture Tone |
Adjusts the overall brightness automatically for a well-balanced result without compromising the gradation of the image. |
-16 (darkens image for an underexposed effect) to +16 (brightens image for an overexposed effect) |
|
Dark Level |
Adjusts the dark areas of the input image. (Each of White/Red/Green/Blue can be adjusted.) To do so, use the |
-7 (darkens the shadows) to +7 (brightens the shadows) |
|
Bright Level |
Adjusts the bright areas of the input image. (Each of White/Red/Green/Blue can be adjusted.) To do so, use the |
-7 (darkens the highlights) to +7 (brightens the highlights) |
Adjustment cannot be made when “Color Profile” is set to “x.v.Color”.
When one of “Custom 1” to “Custom 3” is selected in “Gamma”, you can select a “Correction Value”.
Select “Correction Value”, and press the ![]()
![]() keys to select a correction value (setting value) as a base value for adjustment.
keys to select a correction value (setting value) as a base value for adjustment.
![]()
![]()
![]()
Normal, Brightness Priority, Contrast Priority, Gradation Priority, 1.8, 1.9, 2.0, 2.1, 2.2, 2.3, 2.4, 2.5, 2.6, import
![]()
![]()
![]()
![]()
![]()
When “Picture Mode” is set to “Film”:
Film 1, Film 2, import
When “Picture Mode” is set to a value other than “Film”:
Normal, Brightness Priority, Contrast Priority, Gradation Priority, 1.8, 1.9, 2.0, 2.1, 2.2, 2.3, 2.4, 2.5, 2.6, import
The smaller the value, the brighter the dark areas of the image will become. At the same time, the bright areas will appear blown out.
Selecting “import” enables you to import gamma data that is created externally. The factory setting for “import” is the same as the “Normal” setting.
For more details, please refer to our website.
http://www3.jvckenwood.com/projector/support/index.html
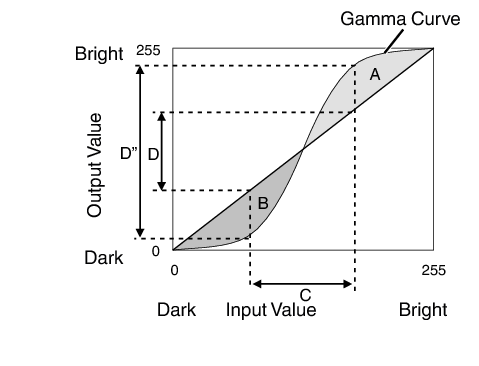
When the gamma curve is a straight line:
The brightness and contrast of the video input will be the same as that of the video output.
Area for which the gamma curve is above the straight line (A):
Video output appears brighter than the input.
Area for which the gamma curve is below the straight line (B):
Video output appears darker than the input.
Area for which the slope of the gamma curve is steep (midtone) (C):
The grayscale range of the video output becomes wider, and the contrast increases (D ![]() D’).
D’).