JVC Global

Global

HD MEMORY CAMERA GZ-HM550
  • Print This Section
  • Select and Print Page
0107-0000

  • Site Map
  • Index

Beginner's Guide

Useful Shooting Techniques

Storage of Files

  • Getting Started
  • Recording
  • Playback
  • Editing
  • Copying
  • Menu Settings
  • Back to Main

  • Verifying the Accessories
  • Charging the Battery Pack
  • Grip Adjustment
  • Inserting an SD Card
  • Clock Setting
  • Changing the Display Language
  • Using the Operation Buttons
  • Using the Slider
  • Holding this Unit
  • Tripod Mounting
  • Using the Remote Control
  • Using Bluetooth-compliant Devices
  • Using this Unit Overseas
  • Optional Accessories
  • Taking Videos in Auto Mode
  • Taking Still Images in Auto Mode
  • Manual Recording
  • Capturing Human Subjects Clearly (Face Detection AE/AF)
  • Taking Group Shots (Self-timer)
  • Registering Files to Events Before Recording
  • Taking Videos in YouTube Format
  • Taking Videos in iTunes Format
  • Slow-motion (High-speed) Recording
  • Recording at Intervals (TIME-LAPSE RECORDING)
  • Recording Automatically by Sensing Movements (AUTO REC)
  • Remaining Recording Time/Battery Power
  • Playing Back Videos
  • Playing Back Still Images
  • Searching for a Specific Video/Still Image
  • Connecting to and Viewing on TV
  • Playing Back Playlists
  • Playing Back a BD/DVD Created on this Unit
  • Deleting Unwanted Files
  • Protecting Files
  • Changing Event Registration of Videos
  • Capturing a Still Image in the Video during Playback
  • Dividing Files
  • Combining Videos Recorded by Seamless Recording
  • Capturing a Required Part in the Video
  • Capturing Videos for Uploading to YouTube
  • Preparing Videos to Transfer to iTunes
  • Creating Playlists from the Recorded Videos
  • Creating a Playlist with Title
  • Copying Files to Card
  • Moving Files
  • Creating Discs with a DVD Writer or External Blu-ray Drive
  • Using a USB External Hard Disk Drive
  • Creating a Disc Using a Connected Blu-ray Recorder
  • Dubbing Files to a DVD Recorder or VCR
  • Copying to Windows PC
  • Copying to Mac Computer
  • Operating the Menu
  • Recording Menu (Video)
  • Recording Menu (Still Image)
  • Manual Settings Menu
  • Playback Menu (Video)
  • Playback Menu (Still Image)
  • Display Settings Menu
  • CLOCK ADJUST
  • Basic Settings Menu
  • Connection Settings Menu
  • Media Settings Menu
Main Page> Getting Started> Using the Operation Buttons

Getting Started

Using the Operation Buttons

  • Verifying the Accessories
  • Charging the Battery Pack
  • Grip Adjustment
  • Using the Hand Strap
  • Inserting an SD Card
  • Types of Usable SD Card
  • Clock Setting
  • Resetting the Clock
  • Changing the Display Language
  • Using the Operation Buttons
  • Using the Slider
  • Holding this Unit
  • Tripod Mounting
  • Using the Remote Control
  • Using Bluetooth-compliant Devices
  • Registering a Bluetooth-compliant Device
  • Connecting to a Registered Device
  • Transferring Still Images to Bluetooth-compliant Devices
  • Operation Using a Smartphone
  • Radio Waves Used by this Product
  • Using this Unit Overseas
  • Charging the Battery Pack Overseas
  • Setting the Clock to Local Time when Traveling
  • Setting Daylight Saving Time
  • Optional Accessories
  • Names of Parts
  • Indications on the LCD monitor
  • Troubleshooting
  • Maintenance
  • Specifications

Functions of the operation buttons may be displayed on the screen according to the feature in use.

Operation Button

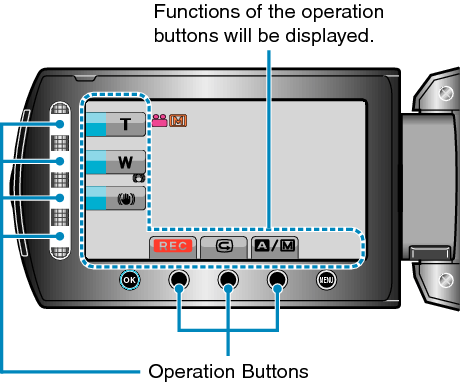
To operate, touch the slider and buttons around the screen lightly with your fingers.

Memo

  • "Touch" denotes the touching of the operation buttons lightly.
  • The slider and buttons do not function if you touch them with your fingernails or with gloves on.
  • The displays on the screen do not work even if you touch them.
Back to Main
Return to Top
JVC Global TOP (English Only) JVC Worldwide Sites (English Only) Contact & Support (English Only)
Terms of Use
© 2011 JVCKENWOOD Corporation