JVC Global

Global

HD MEMORY CAMERA GZ-HM550
  • Print This Section
  • Select and Print Page
0202-0100

  • Site Map
  • Index

Beginner's Guide

Useful Shooting Techniques

Storage of Files

  • Getting Started
  • Recording
  • Playback
  • Editing
  • Copying
  • Menu Settings
  • Back to Main

  • Verifying the Accessories
  • Charging the Battery Pack
  • Grip Adjustment
  • Inserting an SD Card
  • Clock Setting
  • Changing the Display Language
  • Using the Operation Buttons
  • Using the Slider
  • Holding this Unit
  • Tripod Mounting
  • Using the Remote Control
  • Using Bluetooth-compliant Devices
  • Using this Unit Overseas
  • Optional Accessories
  • Taking Videos in Auto Mode
  • Taking Still Images in Auto Mode
  • Manual Recording
  • Capturing Human Subjects Clearly (Face Detection AE/AF)
  • Taking Group Shots (Self-timer)
  • Registering Files to Events Before Recording
  • Taking Videos in YouTube Format
  • Taking Videos in iTunes Format
  • Slow-motion (High-speed) Recording
  • Recording at Intervals (TIME-LAPSE RECORDING)
  • Recording Automatically by Sensing Movements (AUTO REC)
  • Remaining Recording Time/Battery Power
  • Playing Back Videos
  • Playing Back Still Images
  • Searching for a Specific Video/Still Image
  • Connecting to and Viewing on TV
  • Playing Back Playlists
  • Playing Back a BD/DVD Created on this Unit
  • Deleting Unwanted Files
  • Protecting Files
  • Changing Event Registration of Videos
  • Capturing a Still Image in the Video during Playback
  • Dividing Files
  • Combining Videos Recorded by Seamless Recording
  • Capturing a Required Part in the Video
  • Capturing Videos for Uploading to YouTube
  • Preparing Videos to Transfer to iTunes
  • Creating Playlists from the Recorded Videos
  • Creating a Playlist with Title
  • Copying Files to Card
  • Moving Files
  • Creating Discs with a DVD Writer or External Blu-ray Drive
  • Using a USB External Hard Disk Drive
  • Creating a Disc Using a Connected Blu-ray Recorder
  • Dubbing Files to a DVD Recorder or VCR
  • Copying to Windows PC
  • Copying to Mac Computer
  • Operating the Menu
  • Recording Menu (Video)
  • Recording Menu (Still Image)
  • Manual Settings Menu
  • Playback Menu (Video)
  • Playback Menu (Still Image)
  • Display Settings Menu
  • CLOCK ADJUST
  • Basic Settings Menu
  • Connection Settings Menu
  • Media Settings Menu
Main Page> Recording> Taking Still Images in Auto Mode> Zooming

Recording

Zooming

  • Taking Videos in Auto Mode
  • Zooming
  • Capturing Still Images During Video Recording
  • Reducing Camera Shake
  • Checking the Captured Image Immediately
  • Taking Still Images in Auto Mode
  • Zooming
  • Checking the Captured Image Immediately
  • Manual Recording
  • Scene Selection
  • Adjusting Focus Manually
  • Using Focus Assist
  • Adjusting Brightness
  • Setting Shutter Speed
  • Setting White Balance
  • Setting Backlight Compensation
  • Setting Metering Area
  • Recording with Effects
  • Taking Close-up Shots
  • Capturing Human Subjects Clearly (Face Detection AE/AF)
  • Taking Group Shots (Self-timer)
  • Registering Files to Events Before Recording
  • Taking Videos in YouTube Format
  • Taking Videos in iTunes Format
  • Slow-motion (High-speed) Recording
  • Recording at Intervals (TIME-LAPSE RECORDING)
  • Recording Automatically by Sensing Movements (AUTO REC)
  • Remaining Recording Time/Battery Power
  • Names of Parts
  • Indications on the LCD monitor
  • Troubleshooting
  • Maintenance
  • Specifications

The angle of view can be adjusted using zoom.

Use the W end (wide angle end) to shoot a wider field of view.

Use the T end (telephoto end) to magnify the subject for shooting.

ズームするには

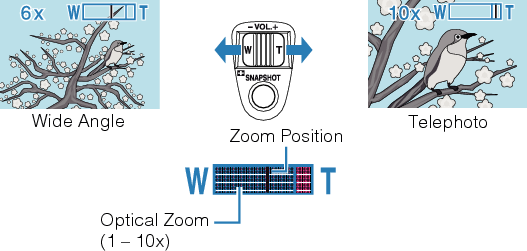
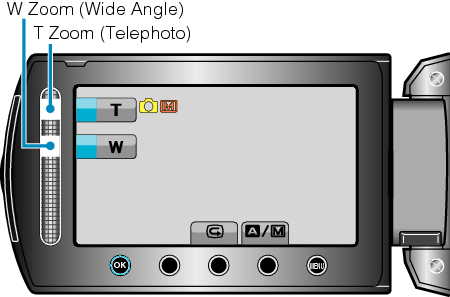
You can also use the slider's T/W zoom to zoom.

Button zoom

Memo

  • Only optical zoom is available in the still image recording mode.
Back to Main
Return to Top
JVC Global TOP (English Only) JVC Worldwide Sites (English Only) Contact & Support (English Only)
Terms of Use
© 2011 JVCKENWOOD Corporation