You can record without worrying about the setting details by using the Intelligent Auto mode. Settings such as exposure and focus will be adjusted automatically to suit the shooting conditions.
-

- Recording
-
Taking Videos in Auto Mode
Taking Videos in Auto Mode
In case of specific shooting scenes such as person etc., its icon is displayed on the screen.
Before recording an important scene, it is recommended to conduct a trial recording.
Turn on the power.
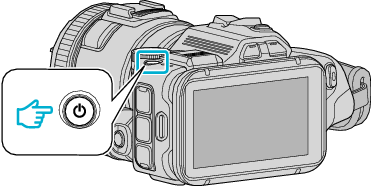
Select video mode.
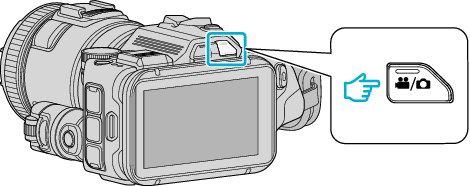
The icon on LCD display is switched to video mode.
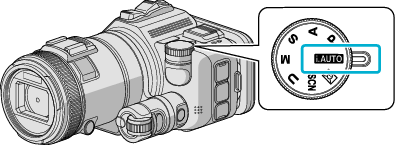
Set the shooting dial to “i.AUTO”.
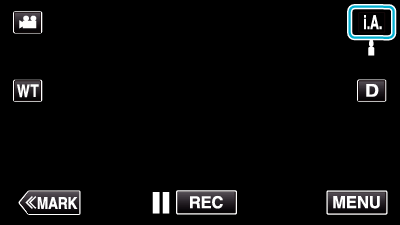
Press the START/STOP button to start recording.
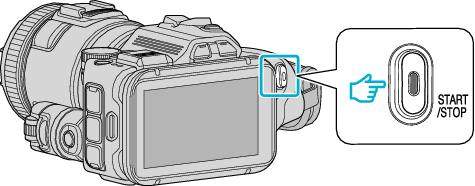
Press again to stop.
Some displays disappear after approximately 3 seconds.
Use the  button to change the displays.
Indications for Video Recording

Display Icon |
Description |
|
|---|---|---|
|
|
Video Quality |
Displays the icon of the “VIDEO QUALITY” setting selected in the recording menu. |
|
|
TOUCH PRIORITY AE/AF |
Displays the setting of “TOUCH PRIORITY AE/AF”. |
|
|
Time |
Displays the current time. |
|
|
Image Stabilizer |
Displays the image stabilizer setting. |
|
|
Recording Media |
Displays the icon of the media where videos are recorded to. |
|
|
Battery Indicator |
Displays the approximate remaining battery power during use. |
|
|
Recording Mode |
Current shooting mode is displayed. |
|
|
Setting Scenes of Intelligent Auto |
Displays scenes detected automatically in the Intelligent Auto function. Multiple scenes may be detected. |
|
|
Remaining Recording Time |
Displays the remaining time for video recording. |
|
|
Scene Counter |
Displays the elapsed time of the video that is currently being recorded. |


Scenes of Intelligent Auto
Display Icon |
Description |
|---|---|
|
|
Captures one’s skin beautifully. |
|
|
Allows people to be captured naturally. |
|
|
Record a group of people with the most suitable settings. |
|
|
Record the smiling face clearly. |
|
|
Records while focusing on a near object. |
|
|
Focuses at a far distance and captures a sharp image with vivid colors. |
|
|
Records in dark places with minimal noise in the overall image. |
|
|
Allows night scenes to be captured accurately with minimal noise in the overall image. |
|
|
Prevents colors from fading even when recording in a bright environment, such as snowfield and beaches. |
|
|
Prevents colors from fading when recording a subject in a spotlight. |
|
|
Reproduces the green color of trees vividly. |
|
|
Reproduces the colors of sunset naturally. |
|
|
Adjusts settings so that the subject does not appear too dark due to backlight. |
|
|
Records while emphasizing the brightness of the colors. |
|
|
Reproduces the natural colors of the outdoors during the day. |
|
|
Reproduces the natural colors of the indoors in a cold-color illumination. |
|
|
Reproduces the natural colors of the indoors in a warm-color illumination. |
|
|
Selects the most suitable settings for handheld shooting. |
|
|
Selects the most suitable settings when a tripod is used for shooting. |


Memo
Scenes can be detected according to the shooting conditions and automatically adjusted in Intelligent Auto mode.
Multiple scenes may be detected depending on the recording conditions.
Some functions may not work properly depending on the shooting conditions.
Operation Buttons for Video Recording
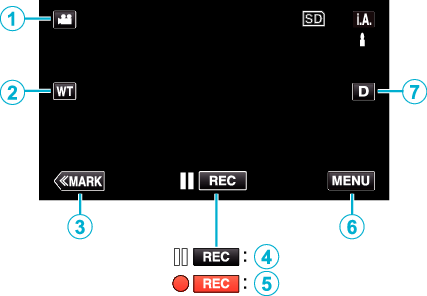
Operation Buttons |
Description |
|
|---|---|---|
|
|
Video/Still Image Mode |
Switches between video and still image modes. |
|
|
T/W Memory Zoom |
Store the zoom position to recall it at the touch of a button. |
|
|
MARK |
Switches to the mark mode, which enables you to insert various marks during shooting. |
|
Recording Start |
Functions as the START/STOP button. |
|
|
MENU |
Displays the various menus of video recording. |
|
|
Display Button |
Switches the display between full ( Simple display: Some displays disappear after approximately 3 seconds. Full display: Displays everything. The display button changes from When the power is turned off, full display ( |
 ) and simple (
 Useful Settings for Recording
When “QUICK RESTART” is set to “ON”, shooting can be started immediately after pressing the power button if the power is turned off within 5 minutes.
When “AUTO POWER OFF” is set to “ON”, this unit turns itself off automatically to conserve power when it is not operated for 5 minutes.
When “TOUCH PRIORITY AE/AF” is set to “FACE TRACKING”, this unit detects faces and automatically adjusts its brightness and focus to record the faces more clearly.
When “DATE/TIME RECORDING” is used, the date and time can be recorded together with the video.
Caution
Do not expose the lens to direct sunlight.
Do not use this unit in the rain, snow, or places with high humidity like the bathroom.
Do not use this unit in places subject to excessive humidity or dust, as well as places exposed to steam or smoke directly.
The power may turn off to protect the circuit if the temperature of this unit rises too much.
Do not remove the battery pack, AC adapter, or SD card when the access lamp is lighted. The recorded data may become unreadable.
This unit is a microcomputer-controlled device. Electrostatic discharge, external noise and interference (from a TV, a radio, etc.) might prevent it from functioning properly. In such a case, turn off the power, then remove the AC adapter and battery pack. This unit will be reset.
Disclaimer
- We shall not be held responsible for loss of recorded contents when recording videos/audio or playback cannot be operated due to malfunctions in this unit, provided parts, or SD card.
- Once deleted, recorded contents (data), including data loss due to malfunctions in this unit, cannot be restored. Please be forewarned.
- JVC will not be responsible for any lost data.
- In order for quality improvement, defective recording medium is subject to be analyzed. Therefore, it may not be returned.
Memo
Check the remaining recording time in the media before you start shooting. If there is not enough space, move (copy) the data to a computer or disc.
When there are many files in the media, it may take time for them to be displayed on the playback screen. Wait for a while as the access lamp appears blinking, which indicates normal operation.
Do not forget to make copies after recording!
Recording stops automatically as it cannot be performed for 12 or more consecutive hours according to specifications.
(It may take some time to resume recording.)
For long recordings, the file is split into two or more files if the size exceeds 4 GB.
You can connect this unit to the AC adapter to record for long hours indoors.
Depending on the subject and shooting conditions, recording may not be performed properly even in the Intelligent Auto mode.
Depending on the shooting conditions, the four corners of the screen may appear dark, but this is not a malfunction. In this case, change the shooting conditions by moving the zoom lever, etc.