For setting whether to supply a 12 V output to devices such as an external screen equipped with a trigger function.
|
Setting |
Description |
|---|---|
|
Off |
No output. |
|
Power |
Outputs control signals (12 V) from the trigger terminal when the power is turned on. |
|
Anamo |
Outputs control signals when the “Anamorphic” setting is changed from “Off” to a setting other than “Off”. Outputs control signals when the projector is powered on if “Anamorphic” is configured to a setting other than “Off” when the power is turned on. |
|
Inst. Mode 1 to Inst. Mode 10 |
Outputs control signals when the “Installation Mode” number to be retrieved is the same as the number configured. Outputs control signals when the projector is powered on if the “Installation mode” has the same number as this setting when the power is turned on. |
When a setting other than “Off” is selected, the control signal output is stopped when the cooling function starts once the power is turned off.
For setting the duration before the power turns off automatically when the projector is not operated.
Setting values: “Off”, “1 Hour”, “2 Hours”, “3 Hours” and “4 Hours”
The setting will be retained even after the Off Timer operation has completed.
|
Setting |
Description |
|---|---|
|
On |
Enables “ECO Mode” to minimize power consumption in the Standby mode. RS-232C / LAN communication cannot be used in the Standby mode. If there is no signal transmission and operation for 15 minutes while an image is projected, the power management switches the equipment automatically into standby mode. |
|
Off |
Select this option to control via RS-232C / LAN communication in the Standby mode or if Control4 is to be used. |
If this unit enters into standby while “ECO Mode” is set to “On”, all the indicators on the unit including the “STANDBY/ON” indicator are turned off. To turn on the power from this state, use the [STANDBY/ON] button on the unit. Alternatively, press any button on the remote control once to cancel the standby mode then press the [ON] button on the remote control.
For specifying the settings for external control from a PC or smartphone.
|
Setting |
Description |
|
|---|---|---|
|
|
On |
Obtains the IP address automatically from the DHCP server inside the connected network. |
|
Off |
For configuring the network settings manually. |
|
|
|
For configuring the IP address. |
|
|
|
For configuring the subnet mask. |
|
|
|
For configuring the default gateway. |
|
|
|
Displays the MAC address of the unit. |
|
|
Set |
Applies the network settings. |
|
|
|
Set to “On” to allow Control4 SDDP to detect this unit. |
|
Glossary of Network Terminology
DHCP:
Abbreviation for Dynamic Host Configuration Protocol. This is a protocol for the network to assign an IP address automatically to the connected device.
IP Address:
Numeric characters for identifying the device that is connected to the network.
Subnet Mask:
Numeric characters that define the bit count used for the network address that is a segment of the IP address.
Default Gateway:
Server for communicating beyond the network that is divided by the subnet mask.
MAC Address:
Abbreviation for Media Access Control address. This is a number that is unique to each network adapter. Each of the network adapters is assigned with a unique MAC address.
For configuring the password during LAN connection.
Characters that are usable include alphabets (upper or lower case), numeric characters, and symbols.
Enter a password with at least 8 characters and not more than 10 characters.
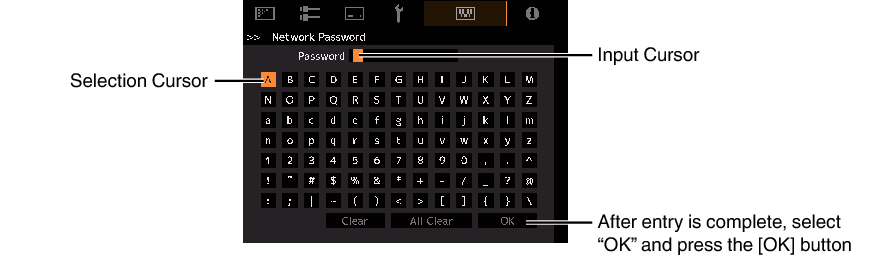
Configuration of a network password is necessary before connecting to the LAN terminal.
Any 3rd party IP control system will have to configure this password into their communication protocol.
For changing the remote control code.
|
Setting |
Description |
|---|---|
|
A |
Change the remote control code from “B” to “A”. |
|
B |
Change the remote control code from “A” to “B”. |
You need to configure the remote control according to the settings of this unit.
-
Hold down the [BACK] button
-
While holding down the [BACK] button, press the [MENU] button for 3 seconds
-
The backlight of the remote control should blink 3 times for Mode A and 2 times for Mode B
You need to configure the remote control according to the settings of this unit.
On the remote control unit, press the [MENU] button for three seconds or longer while pressing and hold the [BACK] button to switch the code.
The backlight of the remote control blinks 3 times: change the remote control code to “A”
The backlight of the remote control blinks 2 times: change the remote control code to “B”
If the setting differs between this unit and the remote control, the “STANDBY/ON” indicator blinks in green when receiving the remote control code.

For setting the high altitude mode to “On” or “Off”.
Set to “On” when using the projector at a location of low atmospheric pressure (higher than 900 m (3,000 ft) above sea level).
For reducing the power consumption through suppressing the current supply for the LD block when the [HIDE] button is pressed to hide the image temporarily.
|
Setting |
Description |
|---|---|
|
Off |
The illumination supply remains on when the [HIDE] button is pressed to hide the image. |
|
On |
The illumination supply is turned off when the [HIDE] button is pressed to hide the image. |
For exporting or importing the projector settings using a commercially available USB flash drive.
Current lens control information (focus, zoom and shift) and the lens control information (focus, zoom and shift) saved in the individual Installation Modes are not exported or imported.
Network passwords are not exported or imported.
Use a USB memory with the following specifications:
1 GB or more, FAT32 format drive
Make sure there are no other folders or files.
Do not turn off the main unit or remove the USB flash drive while it is running. Doing so may cause the projector to malfunction.
Do not change the file name.
For exporting the projector settings to a USB flash drive.
If there is not enough free space on the USB flash drive, the settings may not be exported.
Information such as date and time created is not reflected in the file created during export.
Multiple settings cannot be exported to the same USB flash drive. If the data already exists in the USB flash drive, it will be overwritten.
The data version of the settings file prepared by Export Settings is shown at the top right corner of the Back-up Settings menu,
For retrieving the projector settings from the USB flash drive and applying them to the projector.
Once the settings have been imported, the projector and all LED indicators will turn off.
To turn on the power again, use the ![]() button on the unit. Alternatively, press any button on the remote control once to put it to Standby then press the
button on the unit. Alternatively, press any button on the remote control once to put it to Standby then press the ![]() [ON] button on the remote control.
[ON] button on the remote control.
Importing the settings will overwrite the current settings.
If the data version of the settings file differs from the data version displayed at the top right corner of the Back-up Settings menu, it cannot be imported.
For restoring the settings of this unit to the factory default. However, the following settings will not be reset.
Gamma data saved in “Gamma” ![]() “Correction Value”
“Correction Value” ![]() “Import”.
“Import”.
Color profile data saved in “Color Profile” ![]() “Custom1 to Custom4”.
“Custom1 to Custom4”.
For performing a software update.
For the latest information on the software, refer to https://www.jvc.com/global/support/.
For displaying the license in use.