Changes the available picture modes according to the type of content for viewing.
You can adjust the image quality according to the type of video image you are viewing.
Changes the preconfigured “Picture Mode” setting.
Controls the brightness of the light source by controlling the LD current.
Setting range: 0 to 100
Expands the dynamic range of video expression through controlling the brightness of the light source based on image analysis.
|
Setting |
Description |
|---|---|
|
Off |
Does not control. |
|
Low |
Maintains the peak brightness while automatically optimizing laser light source control and video signal. Weaker control than “High”. |
|
High |
Maintains the peak brightness while automatically optimizing laser light source control and video signal to produce a solid black tone throughout the entire video image. |
|
Balanced |
Adjusts both the shadows and highlights moderately while suppressing the peak brightness. Enhances the depth and reality of the scene. |
This item is not available when “Low Latency” is set to “On”.
This item cannot be set when “Picture Mode” is set to “Natural (LL)”/“HDR10 (LL)”/“HLG (LL)”.
For changing the brightness through controlling the aperture.
Setting range: -15 (stops down) to 0 (opens up)
For adjusting the white level point to avoid clipping or over saturation.
Setting range: -50 (little difference in brightness) to +50 (large difference in brightness)
For adjusting the black level point to avoid clipping or over saturation.
Setting range: -50 (darker) to +50 (brighter)
For adjusting the color saturation of the video image.
Setting range: -50 (lighter) to +50 (deeper)
For adjusting the hue of the video image.
Setting range: -50 (reddish) to +50 (greenish)
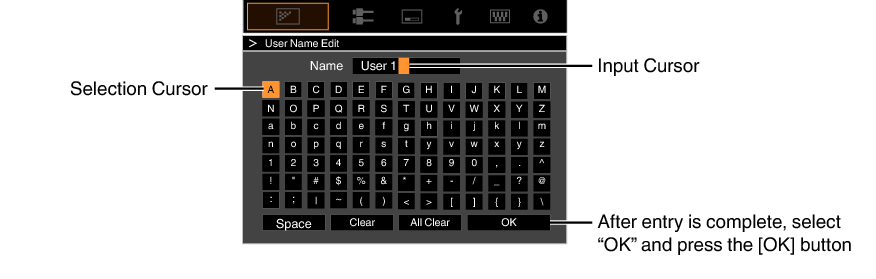
You can edit the “User 1” to “User 6” names in the Picture mode.
Characters that are usable include alphabets (upper or lower case), numeric characters, symbols and blank (space) character. (However, blank (space) cannot be used for the first and last characters.)
Enter not more than 10 characters.
Configures the “Color Profile” (color space information) according to the preconfigured “Picture Mode”. It is also used to fine-tune the preconfigured “Color Profile” settings.
The available “Color Profile” settings vary according to “Picture Mode”.
Each of the colors is adjustable according to the user’s preference.
Configures “Color Temp.” according to the preconfigured “Picture Mode”. It is also used to fine-tune the preconfigured “Color Temp.” settings.
The “Color Temp.” settings available for configuration vary according to “Picture Mode”.
When “Color Profile” is set to “Off (Wide)/Off (Normal)”, the setting is fixed at “High Bright”.
“Color Temp.”
|
Color Temp. |
Description |
|---|---|
|
Xenon 1 |
Color temperature that reproduces the characteristics of a xenon lamp used in cinemas. Xenon 1: A light source color that is emitted by a film projector Xenon 2: A light source color emitted by a projector used for digital cinema |
|
Xenon 2 |
|
|
5500K |
Increasing the value enhances the blue tone of the video image, while decreasing the value enhances the red tone. |
|
6500K |
|
|
7500K |
|
|
9300K |
|
|
High Bright |
Color temperature that gives priority to brightness. |
|
HDR10+ |
Color temperature suitable for viewing HDR10+ content. |
|
HDR10 |
Color temperature suitable for viewing HDR10 content. The default setting is 6500K. |
|
HLG |
Color temperature suitable for viewing HLG content. The default setting is 6500K. |
|
Custom 1 to Custom 2 |
The color temperature of video images can be adjusted manually and saved as one of the three customized settings. |
List of selectable “Color Temp.” according to “Picture Mode”
|
Picture Mode |
Color Temp. |
|---|---|
|
Film |
Xenon 1 |
|
Xenon 2 |
|
|
Custom 1 to Custom 2 |
|
|
Cinema |
5500K |
|
6500K |
|
|
7500K |
|
|
9300K |
|
|
Xenon 1 |
|
|
Xenon 2 |
|
|
High Bright |
|
|
Custom 1 to Custom 2 |
|
|
Natural Natural (LL) Vivid User 1 to User 3 |
5500K |
|
6500K |
|
|
7500K |
|
|
9300K |
|
|
High Bright |
|
|
Custom 1 to Custom 2 |
|
|
HDR10+ |
HDR10+* |
|
FILMMAKER MODE |
6500K |
|
Frame Adapt HDR 1 Frame Adapt HDR 2 HDR Vivid HDR10 HDR10 (LL) |
5500K |
|
6500K |
|
|
7500K |
|
|
9300K |
|
|
High Bright |
|
|
HDR10 |
|
|
Custom 1 to Custom 2 |
|
|
HLG HLG (LL) |
5500K |
|
6500K |
|
|
7500K |
|
|
9300K |
|
|
High Bright |
|
|
HLG |
|
|
Custom 1 to Custom 2 |
|
|
(Continue on next page) |
|
|
User 4 to User 6 |
5500K |
|
6500K |
|
|
7500K |
|
|
9300K |
|
|
High Bright |
|
|
HDR10 |
|
|
HLG |
|
|
Custom 1 to Custom 2 |
|
When “Picture Mode” is set to “HDR10+”, the setting is fixed at “HDR10+”.
Configures the color temperature based on which “Gain Red” / “Gain Green” / “Gain Blue” / “Offset Red” / “Offset Green” / “Offset Blue” are adjusted when “Color Temp.” is configured to “HDR10”“HLG”“Custom 1”“Custom 2”.
The “Correction Value” settings available for configuration vary according to “Picture Mode”.
Adjusts each color in the bright parts of the video image.
Setting range: -255 (reduces the red/green/blue tone) to 0 (no adjustment)
Adjusts each color in the dark areas of the video image.
Setting range: -50 (reduces the red/green/blue tone) to 0 (no adjustment) to +50 (enhances the red/green/blue tone)
List of selectable “Correction Value” according to “Picture Mode”
|
Picture Mode |
Correction Value |
|---|---|
|
Film |
Xenon 1 |
|
Xenon 2 |
|
|
Cinema |
5500K |
|
6500K |
|
|
7500K |
|
|
9300K |
|
|
Xenon 1 |
|
|
Xenon 2 |
|
|
High Bright |
|
|
Natural Natural (LL) Vivid Frame Adapt HDR 1 Frame Adapt HDR 2 HDR Vivid HDR10 HDR10 (LL) HLG HLG (LL) User 1 to User 3 User 4 to User 6 |
5500K |
|
6500K |
|
|
7500K |
|
|
9300K |
|
|
High Bright |
This item adjusts “Gamma/Tone Mapping” according to the preconfigured “Picture Mode” (output value of the projected video with respect to the video signal input). It is also used to adjust the preconfigured “Gamma/Tone Mapping” setting.
The available “Gamma/Tone Mapping” settings vary according to the “Picture Mode”.
When “Picture Mode” is set to “HDR10+”, the setting is fixed at “HDR(Auto)”.
“Gamma/Tone Mapping” cannot be configured when “Picture Mode” is configured to “Frame Adapt HDR 1”/“Frame Adapt HDR 2”/“HDR Vivid”.
For setting the base gamma for the adjustment of “Picture Tone”, “Dark Level” and “Bright Level” when one of the “Custom 1” to “Custom 3” settings is selected in Gamma/Tone Mapping.
For selecting the color for adjusting “Picture Tone”, “Dark Level” and “Bright Level”.
Picture Tone
Adjusts the overall brightness automatically for a well-balanced result without compromising the gradation of the image.
Dark Level / Bright Level
You can adjust the image quality to produce a sharp contrast in the brightness.
This feature automatically configures the overall brightness level during tone mapping according to the screen size and state of the projector.
To use, configure the details of the screen in use in “Screen Setting”, followed by pressing “Set”.
This option does not appear in the menu when “Content Type” is configured to “SDR”.
This can be configured only when “Picture Mode” is configured to “Frame Adapt HDR 1”/“Frame Adapt HDR 2”.
Besides displaying the “Screen Setting” menu using “Installation”![]() “Screen Setting”, you can also press the “Screen Setting” button in the “Theater Optimizer” menu to display it.
“Screen Setting”, you can also press the “Screen Setting” button in the “Theater Optimizer” menu to display it.
Pressing “Set” in the “Theater Optimizer” menu automatically applies the details of the screen and state of the projector in the auto settings of “Theater Optimizer”.
If “Set” is not pressed in the “Theater Optimizer” menu, the settings are applied after the next restart of the unit or change of the “Installation Mode”.
For configuring the picture adjustment feature of the HDR video image.
This item is not available when “Content Type” is set to “SDR”.
This item is not available when “Picture Mode” is set to “HDR10”/“HDR10 (LL)”/“HLG”/“HLG (LL)” or “User 4” to “User 6”.
This is a feature for configuring the content analysis method using “Tone Mapping” when “Picture Mode” is configured to “Frame Adapt HDR 1”/“Frame Adapt HDR 2”/“HDR Vivid”/“FILMMAKER MODE”.
When “Picture Mode” is configured to “HDR10+”, “HDR Processing” is fixed at “HDR10+”. “HDR10+” is used only when the Picture Mode is configured to “HDR10+”.
|
Setting |
Description |
|---|---|
|
Frame by Frame |
Automatically adjusts the HDR tone mapping after analyzing the peak brightness of each frame. |
|
Scene by Scene |
Automatically adjusts the HDR tone mapping after analyzing the peak brightness of each scene. |
|
Static |
Configures based on the mastering information (MaxCLL/FALL) of the content and does not make any dynamic adjustment. |
|
HDR10+ |
Automatically adjusts the brightness for each scene based on the HDR10+ image information. *2 |
This is a feature for adjusting the overall brightness during tone mapping. For configuring the auto correction intensity of the “Theater Optimizer” feature when “Theater Optimizer” is configured to “On”.
When “Picture Mode” is “Frame Adapt HDR 1”/“Frame Adapt HDR 2” and “Theater Optimizer” is “Off”, or “Picture Mode” is “FILMMAKER MODE”
|
Setting |
Description |
|---|---|
|
Auto (Normal) |
Automatically selects an appropriate tone mapping based on the mastering information (MaxCLL/DML) of the content. |
|
Auto (Wide) |
Automatically selects an appropriate tone mapping based on the mastering information (MaxCLL/DML) of the content. A comparison is made with “Auto (Normal)” to switch to the direction that will become brighter. |
|
-2 |
Displays in a tone map with 600 nits as the clip point. |
|
-1 |
Displays in a tone map with 400 nits as the clip point. |
|
0 |
Displays in a tone map with 300 nits as the clip point. |
|
1 |
Displays in a tone map with 200 nits as the clip point. |
|
2 |
Displays in a tone map with 150 nits as the clip point. |
When “Picture Mode” is configured to “Frame Adapt HDR 1”/“Frame Adapt HDR 2”, and “Theater Optimizer” is configured to “On”
|
Setting |
Description |
|---|---|
|
Auto (Normal) |
Automatically corrects the overall brightness level based on the mastering information (MaxCLL/DML) of the content. |
|
Auto (Wide) |
Automatically corrects the overall brightness level based on the mastering information (MaxCLL/DML) of the content. A comparison is made with “Auto (Normal)” to switch to the direction that will become brighter. |
|
-2 to 2 |
For configuring the overall brightness level during auto correction. |
When “Picture Mode” is set to “HDR Vivid”
|
Setting |
Description |
|---|---|
|
High |
Dark areas are easier to see than with “Mid” level setting. |
|
Mid |
Increases the contrast in the low-level and mid-level areas of the image. |
|
Low |
The expression of brighter areas is more subdued than in “Mid” Level Setting. |
When “Picture Mode” is set to “HDR10+”
|
Setting |
Description |
|---|---|
|
High |
Displays the tone map when the overall brightness is configured to the high level. This is suited for large-sized screens. |
|
Mid |
Displays the tone map when the overall brightness is configured to the medium level. This is suited for medium-sized screens. |
|
Low |
Displays the tone map when the overall brightness is configured to the low level. This is suited for small-sized screens. |
To enjoy HDR10+ content when the Picture Mode is “HDR10+”, the following installation conditions are recommended.
|
|
HDR Quantizer: High |
HDR Quantizer: Mid |
HDR Quantizer: Low |
|||
|---|---|---|---|---|---|---|
|
Screen Size |
Projection Distance |
Screen Size |
Projection Distance |
Screen Size |
Projection Distance |
|
|
|
115 |
3.64 |
97 |
3.12 |
89 |
2.66 |
|
|
107 |
3.49 |
92 |
3.00 |
80 |
2.62 |
|
|
HDR Quantizer: High |
HDR Quantizer: Mid |
HDR Quantizer: Low |
|||
|
Screen Size |
Projection Distance |
Screen Size |
Projection Distance |
Screen Size |
Projection Distance |
|
|
|
115 |
143 |
97 |
123 |
89 |
105 |
|
|
107 |
137 |
92 |
118 |
80 |
103 |
When “Picture Mode” is configured to “Frame Adapt HDR 1”/“Frame Adapt HDR 2”/“HDR Vivid”/“FILMMAKER MODE”, the tonal range of the shadows is controlled precisely to enhance the overall contrast of the image.
|
Setting |
Description |
|---|---|
|
On |
Turns on the Deep Black feature for a more realistic expression of darkness. |
|
Off |
Turns off the Deep Black feature. |
This feature allows users to adjust the color saturation and brightness in higher luminance conditions.
|
Settings |
Description |
|---|---|
|
Low |
Corrects adjustments with priority on brightness. |
|
Mid |
Corrects both saturation and brightness in a well-balanced manner. |
|
High |
Corrects adjustments with priority on saturation. |
For configuring the base brightness during auto correction when Gamma/Tone Mapping is configured to “HDR(Auto)”.
The auto correction feature of “HDR(Auto)” is configured based on a 100" screen with a gain of 1.0 in total darkness.
Adjust it in the positive direction if there is insufficient brightness in the viewing environment, and in the negative direction if it is too bright.
This option does not appear in the menu when “Content Type” is configured to “SDR”.
This option does not appear in the menu when “Picture Mode” is configured to “Frame Adapt HDR 1”/“Frame Adapt HDR 2”/“HDR Vivid”/“HDR10+”/“FILMMAKER MODE”.
When “Picture Mode” is configured to “HLG”/“HLG (LL)”, “Mapping Level” is fixed at “0”.
When “Picture Mode” is configured to “HDR10”/“HDR10 (LL)”/“User 4 to User 6”, this option is enabled only when “Tone Mapping” configured to “HDR(Auto)”.
Setting range: -5 to 5
This is a feature for adjusting the sharpness of the displayed image. It employs an original algorithm to create a natural impression that is sharper at areas in focus and softer at areas that are not in focus, enabling you to enjoy highly expressive images with a greater sense of depth.
“Enhance”“NR”“BNR”“MNR” and “Smoother” cannot be configured when “Picture Mode” is configured to “HDR10+”.
“Graphic Mode”“Enhance”“NR”“BNR”“MNR” and “Smoother” cannot be configured when “Picture Mode” is configured to “FILMMAKER MODE”.
For switching the e-shift display.
|
Setting |
Description |
|---|---|
|
On |
Enables e-shift for display in 8K resolution |
|
Off |
Disables e-shift and displays in 4K resolution |
Switches the MPC setting.
It is recommended that this item be configured to “Standard” such as when viewing normal Blu-ray content, and to “High-res 1” such as when viewing 8K/4K resolution content, and to “High-res 2” such as when inputting PC signals.
|
Setting |
Description |
|---|---|
|
Standard |
Performs enhancement that is suited for input signals with a resolution of 4K or lower (particularly videos and animation). |
|
High-res 1 |
Performs enhancement that is suited for input signals with a resolution of 8K/4K (particularly cinemas and films) |
|
High-res 2 |
Video image with minimal enhancement. |
For adjusting the high-frequency areas. Increasing the value enhances the definition for a sharper image quality.
Setting range: 0 to 10
For reducing the noise of the video image.
Setting range: 0 (weak) to 10 (strong)
For reducing the block noise of the video image.
Setting range: 0 (weak) to 3 (strong)
For reducing the mosquito noise of the video image.
Setting range: 0 (weak) to 3 (strong)
For suppressing tone gradation steps that occur in content with low bitrate.
|
Setting |
Description |
|---|---|
|
On |
Turns on the Smoother feature to suppress tone gradation steps |
|
Off |
Turns off the Smoother feature. |
Toggling between the States before and during Adjustment
Pressing the [HIDE] button on the remote control enables you to toggle between the states before adjustment and during adjustment.
For reducing the after-image, which occurs in a fast-moving scene.
Clear Motion Drive
Motion Enhance