Collectively manages the setting values of “Lens Control”, “Pixel Adjust”, “Mask”, “Anamorphic”, “Screen Setting”, “Installation Style”, “Keystone” and “Aspect”.
The lens position may be shifted slightly with respect to the position that was saved.
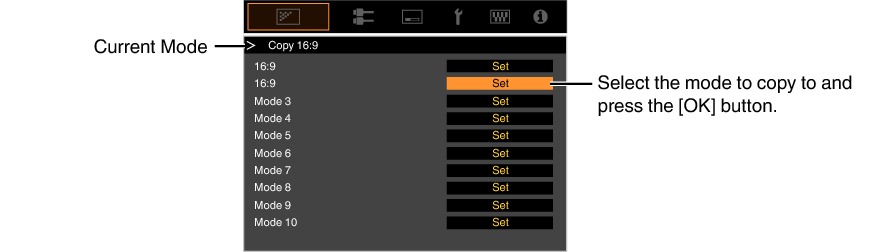
For selecting the group to save and retrieve the setting values.
Setting values: Mode 1 to Mode 10
The name of the setting value can be changed using “Name Edit”.
For editing the name of Installation Mode.
Characters that are usable include alphabets (upper or lower case), numeric characters, symbols and blank (space) character. (However, blank (space) cannot be used for the first and last characters.)
Enter not more than 10 characters.

For copying the setting values managed by the current Installation Mode to another mode.
Focus / Zoom / Shift
For adjusting the lens according to the projection position
For setting whether to display the lens adjustment pattern.
|
Setting |
Description |
|---|---|
|
Off |
Displays external signals, and does not display the lens adjustment pattern. |
|
On |
Displays the lens adjustment pattern. |
For setting whether to lock or unlock the lens.
Setting to “On” to lock the lens allows you to preserve the adjustment status of the lens.
|
Setting |
Description |
|---|---|
|
Off |
Does not lock the lens. |
|
On |
Locks the lens to prevent any erroneous operation on the adjustments. Even when “On”, the lens will be in the mode selected by “Installation Mode”. |
Returns the lens position to the center.
For correcting the phase shifting between each RGB color by adjusting the pixel.
For setting the adjustment feature to On or Off.
|
Setting |
Description |
|---|---|
|
Whole |
Adjusts the entire image. |
|
Zone |
Enables fine adjustment of each area by dividing the screen evenly into 10 vertical and horizontal zones. |
For selecting the color to adjust (“Red” or “Blue”).
|
Setting |
Description |
|---|---|
|
Off |
Displays the external signals without displaying the test pattern for adjustment. |
|
On |
Displays the test pattern for adjustment. |
For setting the color of the adjustment pattern displayed during adjustment to “White” or “Yellow / Cyan”.
When “Adjust Area” is set to “Whole”, adjustment can be made by moving in units of one pixel on the screen of the color selected in “Adjust Color”.
Adjustment cannot be made when “Adjust Area” is set to “Zone”.
|
Setting |
Description |
|---|---|
|
H (Horizontal) |
Setting range: -2 (moves red/blue to the left) to +2 (moves red/blue to the right) |
|
V (Vertical) |
Setting range: -2 (moves red/blue downward) to +2 (moves red/blue upward) |
When “Adjust Area” is set to “Whole”, adjustment can be made by moving in units of 1/8 pixel on the screen of the color selected in “Adjust Color”.
When “Adjust Area” is set to “Zone”, the screen is divided evenly into 10 vertical and horizontal zones, and fine adjustment of each area is possible.
|
Setting |
Description |
|---|---|
|
H (Horizontal) |
Setting range: -31 (moves red/blue to the left) to +31 (moves red/blue to the right) |
|
V (Vertical) |
Setting range: -31 (moves red/blue downward) to +31 (moves red/blue upward) |
Reset
Restores all pixel adjustment data to the factory default.
For making general adjustments to slight color fringing in the horizontal/vertical directions of the video image.
-
Set “Adjust Area” to “Whole”
-
Select “Adjust Color” and “Adjust Pattern Color”
-
Select “Adjust (Pixel)”, and press the [OK] button
-
Use the [


 ] keys to move and adjust the vertical and horizontal pixels of the entire zone
 -
After adjustment is complete, press the [BACK] button twice to exit the Adjustment mode
The Adjustment mode is activated, and the selected adjustment pattern and Adjustment (Pixel) window are displayed.
The adjustment setting appears at the center of the Adjustment (Pixel) window.
Remote Control Operation Guide
|
Button Name |
Function |
Description of Operation |
|---|---|---|
|
[PICTURE MODE] |
Adj.Col. |
Changes “Adjust Color”. |
|
[C.M.D.] |
Pixel/Fine |
Switches between “Adjust (Pixel)” and “Adjust (Fine)”. Switches to “Adjust (Pixel)” when “Adjust Area” is set to “Zone”. |
|
[GAMMA SETTINGS] |
Pat.Col. |
Changes “Adjust Pattern Color”. |
|
[ADVANCED MENU] |
Adj.Area |
Switches “Adjust Area”. A zone cursor appears on the adjustment pattern when the “Zone” setting is selected. |
For making general adjustments on the misalignment of the entire screen using “Adjust (Pixel)”, followed by making fine adjustments.
-
Set “Adjust Area” to “Whole”
-
Select “Adjust Color” and “Adjust Pattern Color”
-
Select Adjust (Fine), and press the [OK] button
-
Use the [
] keys to move and adjust the vertical and horizontal pixels of the entire zone -
After adjustment is complete, press the [BACK] button twice to exit the Adjustment mode
The Adjustment mode is activated, and the selected adjustment pattern and Fine window are displayed.
The adjustable range may be smaller depending on the pixels being adjusted on the entire screen.
The adjustment setting appears at the center of the Fine window.
If both the maximum overall screen misalignment of H (horizontal direction) and V (vertical direction) are “31”, you cannot select a value that is larger than the displayed setting even when the adjustment setting is lower than the maximum value.
If the minimum overall screen misalignment is “-31”, you cannot select a value that is smaller than the displayed setting even when the adjustment setting is higher than the minimum value.
For fine-tuning misalignments on a part of the screen after adjusting the overall screen misalignment using “Adjust (Pixel)” and “Adjust (Fine)”.
The screen can be divided vertically and horizontally into 10 sections for partial adjustments to be made.
-
Set “Adjust Area” to “Zone”
-
Select “Adjust Color” and “Adjust Pattern Color”
-
Select Adjust (Fine), and press the [OK] button
-
Press the [
] keys to move the cursor to the point to be adjusted -
Press the [OK] button to enter the Adjustment mode
-
Use the [
] keys to move and adjust the vertical and horizontal pixels of the entire zone -
After adjustment is complete, press the [BACK] button twice to exit the Adjustment mode
The Adjustment mode is activated, and the selected adjustment pattern and Zone Adjustment window are displayed.
The adjustable range may be smaller depending on the pixels being adjusted on the entire screen.
The adjustment setting appears at the center of the Zone Adjustment window.
For hiding the peripheral area of the image with a mask (black strip).
|
Setting |
Description |
|---|---|
|
Off |
Not masked. |
|
On |
Hides the ranges specified in “Top”, “Bottom”, “Left” and “Right” by masking (with black strips). |
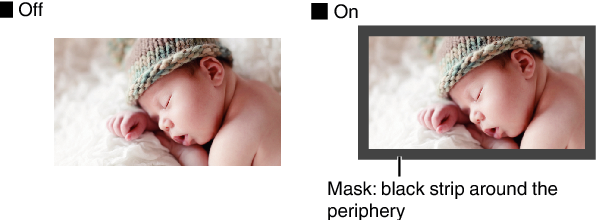
“Top” / “Bottom” / “Left” / “Right”
For specifying the ranges to hide by masking (with black strips).
Setting range: 0 to 220
Configure this setting when an anamorphic lens is used.
|
Setting |
Description |
|---|---|
|
Off |
Projects the 2.35:1 image without any changes. |
|
A |
Projects the 2.35:1 image with it stretched in the vertical direction only using a 3840 pixel width. |
|
B |
Projects the 16:9 image with it compressed in the horizontal direction only. |
|
C |
This is a mode used exclusively for the DCR lens of Panamorph. This is configured to “A” in the 3D mode. |
|
D |
This is a mode used exclusively for the DCR lens of Panamorph. |
Corrects the color temperature according to the properties of the screen to be used.
Selecting the optimal correction mode enables corrections to be performed to reproduce natural images with balanced colors.
This feature is not available when “Color Profile” is configured to “Off (Wide)” or “Off (Normal)”.
|
Setting |
Description |
|---|---|
|
Off |
Does not perform correction |
|
On |
Corrects the color temperature according to the properties of the screen configured in “Screen No.”. |
For configuring the correction mode according to the screen to be used.
This item cannot be set when “Screen Adjust” is set to “Off”.
For information on the screen and the corresponding correction mode, please visit our website.
https://www.jvc.com/global/projector/screen
You can utilize the optional optical sensor and dedicated projector calibration software to make finer adjustments.
For details on the dedicated projector calibration software, please visit our website.
For configuring the size (diagonal) of the screen for viewing when using the “Theater Optimizer” function.
For configuring the aspect ratio of the screen for viewing when using the “Theater Optimizer” function.
For configuring the gain of the screen for viewing when using “Theater Optimizer”.
Configuring “Theater Optimizer” to “On” enables the brightness level during “Tone Mapping” to be adjusted automatically according to the screen size and state of the projector when picture mode is configured to “Frame Adapt HDR 1”/“Frame Adapt HDR 2”.
The “Theater Optimizer” can be displayed by selecting “Theater Optimizer”. (This option is disabled when picture mode is configured to a mode other than “Frame Adapt HDR 1”/“Frame Adapt HDR 2”.)
The “Screen Size”“Screen Gain” settings will be applied to the auto settings of “Theater Optimizer” during the next restart of the unit or change of the “Installation Mode”.
To apply the settings immediately, press “Set” in the “Theater Optimizer” menu.
For setting to “Front”, “Ceiling Mount (F)”, “Rear”, or “Ceiling Mount (R)” according to the installation status of the projector.
“Front” or “Ceiling Mount (F)” is set when projector is installed in the front with respect to the screen.
“Rear” or “Ceiling Mount (R)” is set when projector is installed in the rear with respect to the screen.
For correcting any keystone distortion that occurs when the projector is installed at an angle with respect to the screen. Vertical Keystone only.
Vertical setting range: -7 to 7
Increasing the value changes the aspect slightly.
Image will reduce in size when keystone is adjusted.

Aspect
The screen size of the projected image can be adjusted optimally according to the original screen size (aspect) that has been input.