By obtaining a dynamic DNS account, this unit may be used on the web as usual even if the IP address changes when making an access to this unit via internet.
-

- Using Wi-Fi by Creating a QR Code
-
OUTDOOR MONITORING
OUTDOOR MONITORING
Setting (Once setting is done, start from the “Regular Operation” below)
1Obtaining a Dynamic DNS Account
Only the JVC dynamic DNS service can be set on this camera.
To obtain (register) an account, perform the following steps.
Caution
Registration will be canceled if you do not access the dynamic DNS server from the camera within 3 days.
Perform the registration again in this case.
Registration will not be complete if the username and password set on this camera are incorrect. Be sure to check that they are correct.
Successful registration will be canceled too if you do not access the dynamic DNS server for 1 year.
2Create a QR code.
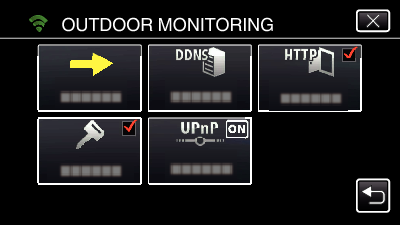
Enter values in the required items for outdoor monitoring.
Password: set a password to connect this camera to the device via an access point. (Not more than 8 characters)
DDNS: Set the connection environment to the internet. Normally set to “ON”.
User name (DDNS): set an user name for the obtained DDNS account.
Password (DDNS): set a password for the obtained DDNS account.
UPnP: Set to “ON” if the UPnP protocol may be used to connect the device to the network.
HTTP Port: Set the port number for connecting to the internet. Normally set to “80”.
3Display the screen for reading the QR code.
Tap “MENU”.
(Operation on this camera)
_IZYUILvdsdgwox.png)
The top menu appears.
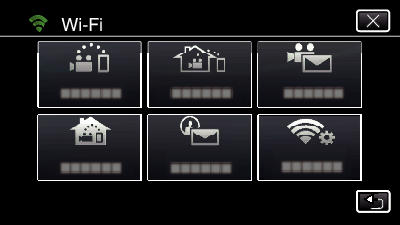
Tap the “Wi-Fi” (  ) icon.
(Operation on this camera)
_UJDCILkrscevgk.png)
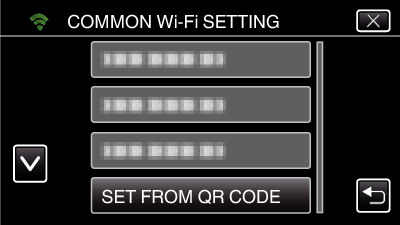
Tap “COMMON Wi-Fi SETTING”.
(Operation on this camera)
Tap “SET FROM QR CODE”.
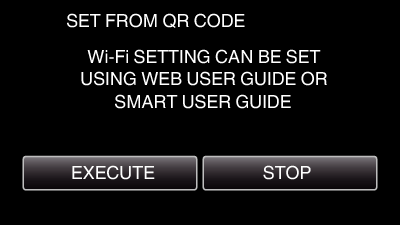
Tap “EXECUTE”.
4Read a QR code.
Read a QR code.
(Operation on this camera)

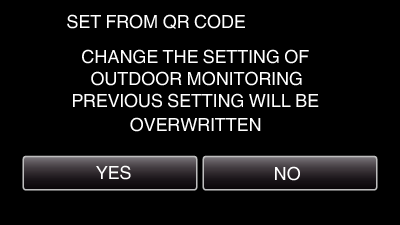
Tap “YES”.
Tap “OK”.
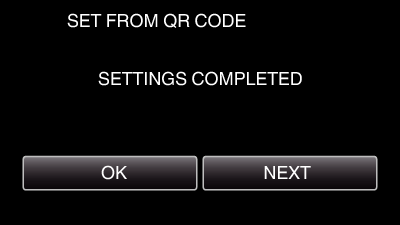
Tap “NEXT” to return to the screen to read the QR code.
Set contents are saved.
5Registering the access points (wireless LAN router) to this unit
Wi-Fi Protected Setup (WPS) Registration
Tap “MENU”.
(Operation on this camera)
The top menu appears.
Tap the “Wi-Fi” ( ) icon.
(Operation on this camera)
Tap “COMMON Wi-Fi SETTING”.
(Operation on this camera)
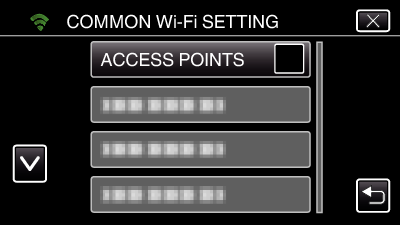
Tap “ACCESS POINTS”.
(Operation on this camera)
Tap “ADD”.
(Operation on this camera)

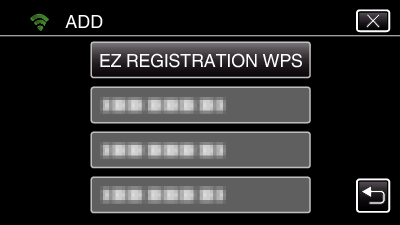
Tap “EZ REGISTRATION WPS”.
(Operation on this camera)
Activate WPS of the access point (wireless LAN router) within 2 minutes.
To activate WPS, refer to the instruction manual of the device in use.
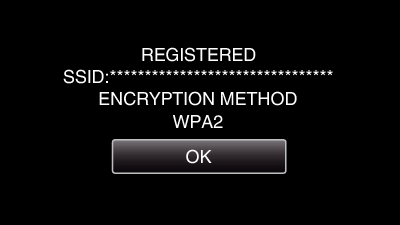
After registration is complete, tap “OK” on the camera’s screen.
(Operation on this camera)
Search the access point, and select from the list.
Set the name (SSID) of the access point (wireless LAN router) and the password beforehand.
Tap “MENU”.
(Operation on this camera)
The top menu appears.
Tap the “Wi-Fi” ( ) icon.
(Operation on this camera)
Tap “COMMON Wi-Fi SETTING”.
(Operation on this camera)
Tap “ACCESS POINTS”.
(Operation on this camera)
Tap “ADD”.
(Operation on this camera)
Tap “SEARCH”.
(Operation on this camera)
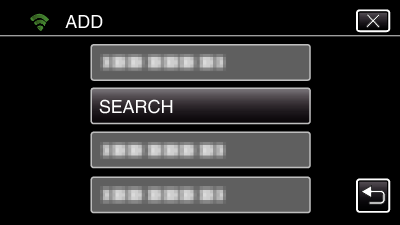
The search results appear on the camera’s screen.
Tap the name (SSID) of the desired access point from the list of search results.
(Operation on this camera)
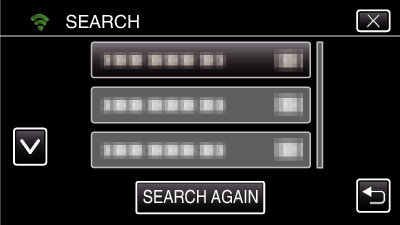
Register a password.
(Operation on this camera)
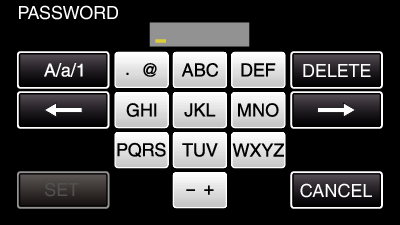
Tap on the on-screen keyboard to enter characters. The character changes with every tap.
“ABC”, for example, enter “A” by tapping once, “B” by tapping twice, or “C” by tapping 3 times.
Tap “DELETE” to delete a character.
Tap “CANCEL” to exit.
Tap “A/a/1” to select character input type from upper case letter, lower case letter, and number.
Tap ![]() or
or ![]() to move one space to the left or right.
to move one space to the left or right.
The password is not required if the wireless LAN router is not security protected.
After registration is complete, tap “OK” on the camera’s screen.
(Operation on this camera)
Other methods, such as “Manual Registration” and “WPS PIN Registration” are also available. Refer to the following link for details.
Regular Operation
6Connect this camera to a smartphone (or computer).
Tap “MENU”.
(Operation on this camera)
The top menu appears.
Tap the “Wi-Fi” ( ) icon.
(Operation on this camera)
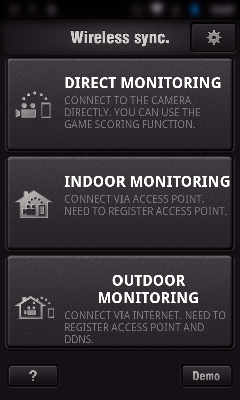
Tap “OUTDOOR MONITORING” (  ).
).
(Operation on this camera)
Tap “START” (  ).
).
(Operation on this camera)
Start making a connection.
(Operation on this camera)
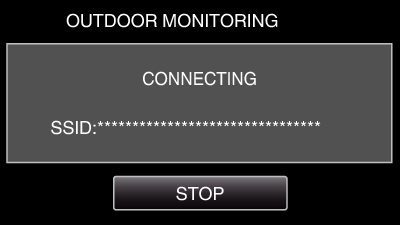
Name (SSID) of the access point (wireless LAN router) in connection is displayed.
The following is displayed when the camera is connected to the access point.
The URL (WAN) for the smartphone to connect to appears.
(Does not appear if DDNS is not set or set incorrectly.)
“ ![]() UPnP” is displayed when UPnP cannot be used.
UPnP” is displayed when UPnP cannot be used.
Check the URL (WAN).
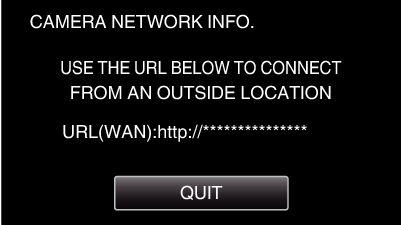
After checking the URL, tap “QUIT” to return to the previous screen.
“ ![]() UPnP” is displayed when UPnP cannot be used.
UPnP” is displayed when UPnP cannot be used.
Operation on the smartphone
Memo
Prior to use this function, a smartphone application needs to be installed on the smartphone.
Start “Wireless sync.” on the smartphone after setting OUTDOOR MONITORING.

Tap “START” in OUTDOOR MONITORING on the camera to start.
Tap “OUTDOOR MONITORING”.
Log in with your username and password.
(if authentication cannot be achieved)
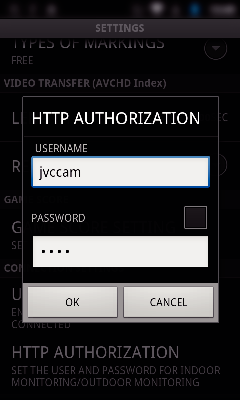
The username is “jvccam” and the default password is “0000”.
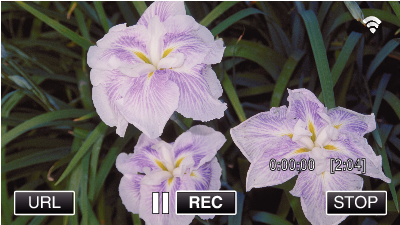
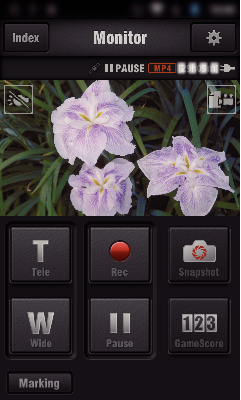
The recording screen is displayed.
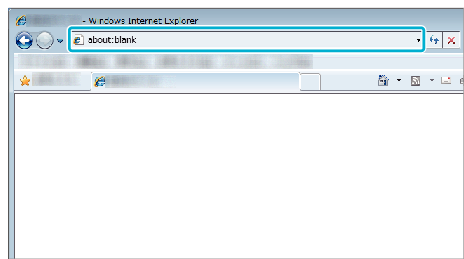
Monitoring from the computer (Windows7)
On the Internet Explorer (web browser), enter the URL (WAN) that is checked by “Operation on this camera”.
Log in with your username and password.
The username is “jvccam” and the default password is “0000”.
Operations from the Web browser