Set the name (SSID) of the access point (wireless LAN router) and the password beforehand.
-

- Using Wi-Fi by Creating a QR Code
-
DETECT/MAIL
DETECT/MAIL
Setting (Once setting is done, start from the “Regular Operation” below)
1Create a QR code.
Memo
Perform operations in step 2 and 3 after creating a QR code, and read the QR code one by one by the camera.
Enter values in the required items for setting the recipient’s e-mail address.
E-mail address: set the recipient’s e-mail address.
E-mail function: set the function of the e-mail that is transmitted to the recipient’s e-mail address.
Up to 8 e-mail addresses can be set.
Start reading from (1) if multiple e-mail addresses are set. Click the number or “<”, “>”.
Enter values in the required items for setting the sender’s e-mail address.
E-mail address: set the sender’s e-mail address.
Enter values in the required items for setting the e-mail server (SMTP server).
SMTP server: set the name of the e-mail server (SMTP server) from which an e-mail account is obtained.
SMTP port number: set according to the condition when the e-mail account is obtained. Normally set to “25”.
SMTP authentication method: set according to the condition when the e-mail account is obtained.
User name: set if the SMTP authentication method is set to other than “None”. (same as the registered user name (account name) when the e-mail account is obtained)
Password: set if the SMTP authentication method is set to other than “None”. (same as the registered password when the e-mail account is obtained)
Enter values in the required items for setting notification mails.
Detection method: set the detection method of when to start recording video for notification e-mails.
Detecting interval: select the time period to enable detection again after the previous one.
Self recording: specify whether to save the detected video on the camera (ON) or not (OFF).
2Display the screen for reading the QR code.
Tap “MENU”.
(Operation on this camera)
_IZYUILvdsdgwox.png)
The top menu appears.
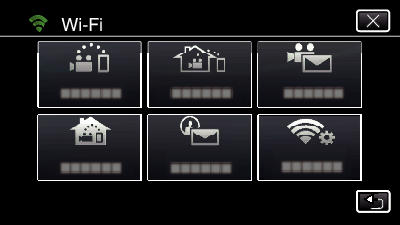
Tap the “Wi-Fi” (  ) icon.
(Operation on this camera)
_UJDCILkrscevgk.png)
Tap “COMMON Wi-Fi SETTING”.
(Operation on this camera)
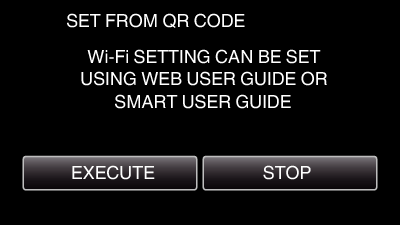
Tap “SET FROM QR CODE”.
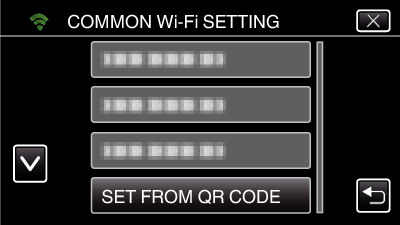
Tap “EXECUTE”.
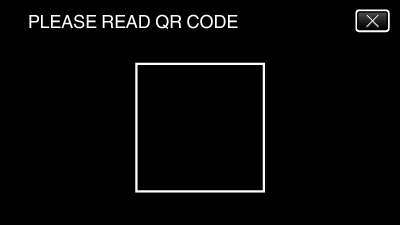
3Read a QR code.
Read a QR code.
(Operation on this camera)
Tap “YES”.
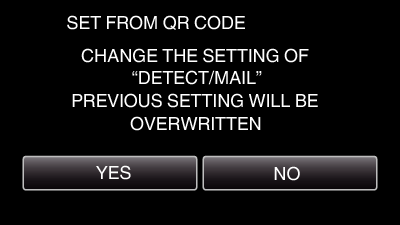
Contents of the screen vary depending on the QR code that is read by this unit.
Tap “OK”.
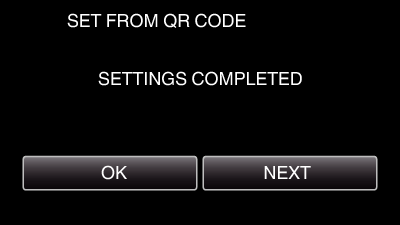
Tap “NEXT” to return to the screen to read the QR code.
Set contents are saved.
4Registering the access points (wireless LAN router) to this unit
Wi-Fi Protected Setup (WPS) Registration
Tap “MENU”.
(Operation on this camera)
The top menu appears.
Tap the “Wi-Fi” ( ) icon.
(Operation on this camera)
Tap “COMMON Wi-Fi SETTING”.
(Operation on this camera)
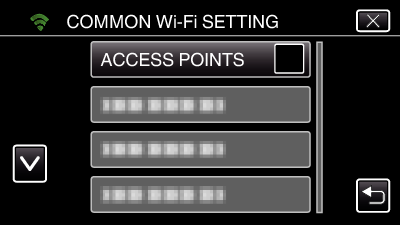
Tap “ACCESS POINTS”.
(Operation on this camera)
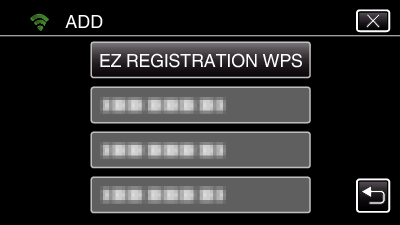
Tap “ADD”.
(Operation on this camera)

Tap “EZ REGISTRATION WPS”.
(Operation on this camera)
Activate WPS of the access point (wireless LAN router) within 2 minutes.
To activate WPS, refer to the instruction manual of the device in use.
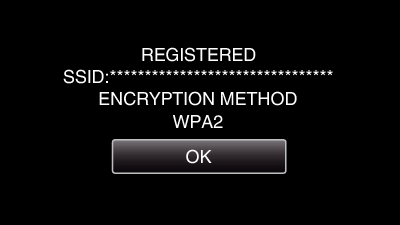
After registration is complete, tap “OK” on the camera’s screen.
(Operation on this camera)
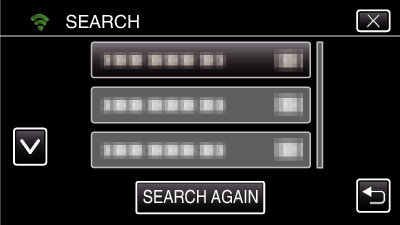
Search the access point, and select from the list.
Tap “MENU”.
(Operation on this camera)
The top menu appears.
Tap the “Wi-Fi” ( ) icon.
(Operation on this camera)
Tap “COMMON Wi-Fi SETTING”.
(Operation on this camera)
Tap “ACCESS POINTS”.
(Operation on this camera)
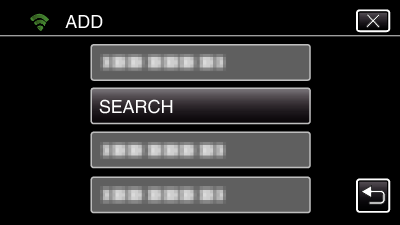
Tap “ADD”.
(Operation on this camera)
Tap “SEARCH”.
(Operation on this camera)
The search results appear on the camera’s screen.
Tap the name (SSID) of the desired access point from the list of search results.
(Operation on this camera)
Register a password.
(Operation on this camera)
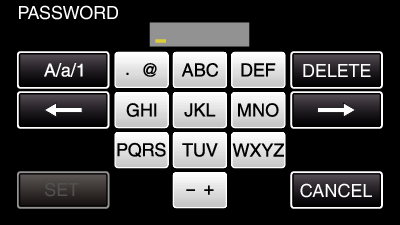
Tap on the on-screen keyboard to enter characters. The character changes with every tap.
“ABC”, for example, enter “A” by tapping once, “B” by tapping twice, or “C” by tapping 3 times.
Tap “DELETE” to delete a character.
Tap “CANCEL” to exit.
Tap “A/a/1” to select character input type from upper case letter, lower case letter, and number.
Tap ![]() or
or ![]() to move one space to the left or right.
to move one space to the left or right.
The password is not required if the wireless LAN router is not security protected.
After registration is complete, tap “OK” on the camera’s screen.
(Operation on this camera)
Other methods, such as “Manual Registration” and “WPS PIN Registration” are also available. Refer to the following link for details.
Regular Operation
5Sending a Notification Mail.
Tap “MENU”.
Set the camera to the recording mode.
The top menu appears.
Tap the “Wi-Fi” ( ) icon.
Tap “DETECT/MAIL” (  ).
).
Tap “DETECT/MAIL ATTN.”.
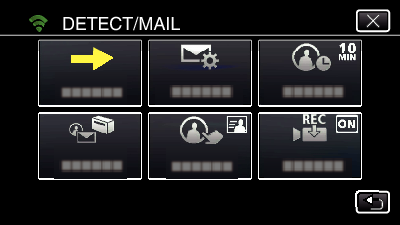
Select “DETECT/MAIL ATTN.”, then tap  .
.
To display the icon, tap the e-mail address.
To cancel the e-mail address, press the icon one more time.
Up to 8 e-mail addresses can be selected.
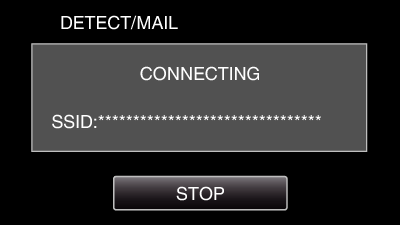
Tap “START” (  ).
).
Start making a connection.
DETECT/MAIL detection standby
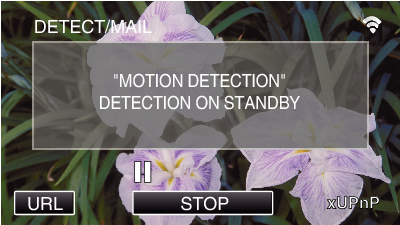
Detection is suspended for the first 5 seconds.
DETECT/MAIL detection in progress (an e-mail is automatically sent out after detection is completed)
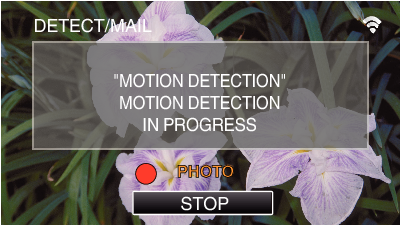
The “PHOTO” icon appears on the screen for about 2 seconds upon detection.
Images are captured automatically when moving subjects or human faces appear on the camera’s screen. (The PHOTO icon appears on the screen upon detection.)
The captured still images will be sent via e-mail to the selected recipients.
Detection suspended
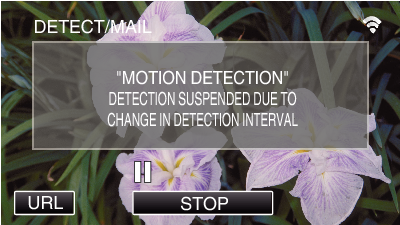
Until the next detection is made, detection is suspended for the pre-set length of time.
“DETECTION INTERVAL” can be selected from 15 seconds, 1 minute, 3 minutes, 10 minutes, 30 minutes and 60 minutes.