You can record audio from the two channels (CH1/CH2) in synchronization with video images on this camera recorder.
Audio Recording
TOPSelect from the four options below to record the audio.
Built-in Microphone
Microphone connected to [AUX] terminal
Microphone connected to [INPUT1] terminal
Microphone connected to [INPUT2] terminal
Selecting Audio to Be Recorded in Each Channel
Select the audio to be recorded in CH1/CH2.
|
- |
Switch Setting |
Connected Devices |
|---|---|---|
|
CH1 |
INT |
Built-in Microphone Microphone connected to [AUX] terminal |
|
INPUT1 |
Microphone connected to [INPUT1] terminal |
|
|
CH2 |
INT |
Built-in Microphone Microphone connected to [AUX] terminal |
|
INPUT1 |
Microphone connected to [INPUT1] terminal |
|
|
INPUT2 |
Microphone connected to [INPUT2] terminal |
Memo
When “INT” is set, the built-in microphone is disabled if a microphone is connected to the [AUX] terminal; audio from the microphone connected to the [AUX] is recorded.
When “INT” is selected, set the reference input level in [Main Menu]  [A/V Set] [Audio Set] [Int. Mic Gain]/[AUX Gain].
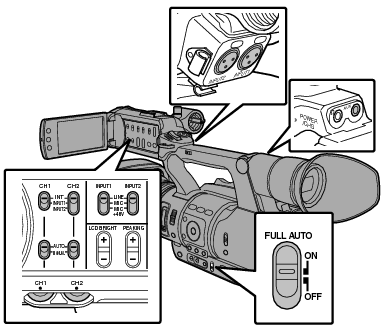
Setting Input Channel to [INPUT1]/[INPUT2]
Select the audio to input to [INPUT1] and [INPUT2] terminals with the [INPUT1]/[INPUT2] mode switch.
|
Setting |
Description |
|---|---|
|
[LINE] |
Use this setting when connecting to an audio device or other equipment. The reference input level is +4 dBu. |
|
[MIC] |
Use this setting when connecting to a dynamic microphone. |
|
[MIC+48V] |
Use this setting when connecting to a microphone (phantom microphone) that requires a +48 V power supply. |
Memo
When “MIC” or “MIC+48V” is selected, set the reference input level in [Main Menu] [A/V Set] [Audio Set] [Input1 Mic Ref.]/[Input2 Mic Ref.].
Caution
When connecting a device that does not require a +48 V power supply, make sure that it is not set to the “MIC+48V” position.
When the [INPUT1]/[INPUT2] mode switch is set to “MIC”, make sure that a microphone is connected to the [INPUT1]/[INPUT2] terminal. If you increase the recording level when a microphone is not connected, noise from the input terminal may be recorded.
When a microphone is not connected to the [INPUT1]/[INPUT2] terminal, set the [INPUT1]/[INPUT2] mode switch to “LINE” or adjust the volume with the [CH1]/[CH2] recording level adjustment knob.
Adjusting Audio Recording Level
You can select to adjust the audio recording levels for the two channels (CH1/CH2) manually or automatically.
Manual Adjustment Mode (Manual Adjustment)
Set the [CH1/CH2 AUTO/MANUAL] switch on the camera recorder to “MANUAL” to enter the manual adjustment mode, and use the [CH1]/[CH2] recording level adjustment knob to set the recording level.
You can adjust the level manually during the recording, recording standby, and stop modes.
 Setting Input Channel to “INPUT1”/“INPUT2”
Set the [CH1/CH2 AUTO/MANUAL] selection switch to “MANUAL” for the channel to be adjusted manually.
Turn the corresponding [CH1]/[CH2] recording level adjustment knob to adjust the level.
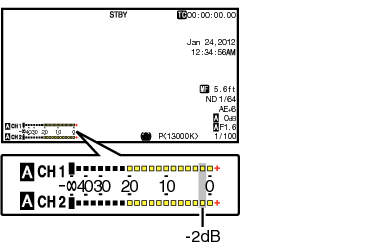
When [Audio Set] [Limiter] is set to “Off”, adjust such that the audio level meter does not light up at -2 dB even for loud sounds.
Setting Input Channel to “INT” for Both [CH1] and [CH2]
Set the [CH1 AUTO/MANUAL] selection switch to “MANUAL”.
Turn the [CH1] recording level adjustment knob to adjust the level.
When the built-in microphone and the [AUX] input terminal are used, the recording levels of [CH1] and [CH2] are interlocked.
This is also effective when the [CH1 AUTO/MANUAL] selection switch is set to [CH2].
Memo
Select [Limiter], [AGC Response], [AGC Mode], or [Int. Mic Separation] in the menu to set the recording audio.
If [Limiter] is set to other than “Off”, the limiter operates according to the value set.
For the reference level to be recorded to an SD card, set [Main Menu] [A/V Set] [Audio Set] [Ref. Level] to “-20dB”, “-18dB”, or “-12dB”. (common for CH1/CH2)
The operations of the [CH2] recording level adjustment knob and [CH2 AUTO/MANUAL] selection switch are disabled.
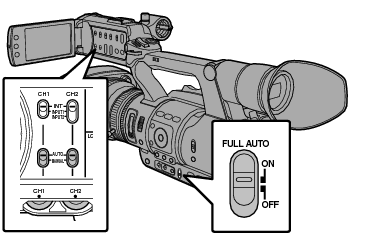
Automatic Adjustment Mode
Set the [CH1/CH2 AUTO/MANUAL] selection switch to “AUTO” or the [FULL AUTO] switch to “ON” to enter Automatic Adjustment mode. The audio recording level is set automatically according to the input level.
When the [FULL AUTO] switch is set to “ON”, mode switching with the [CH1/CH2 AUTO/MANUAL] selection switch is disabled.
Memo
When [Main Menu] [A/V Set] [Audio Set] [Limiter] is set to “Off” while in the automatic adjustment mode, the limiter operates at -5 dBFS.
If [Limiter] is set to other than “Off”, the limiter operates according to the value set.
When [A/V Set] [Audio Set] [Audio On FULL AUTO] is set to “SW Set”, you can switch the audio recording mode with the [CH1/CH2 AUTO/MANUAL] selection switch on the camera recorder even if the [FULL AUTO] switch is set to “ON”.