Hold down the lock button (blue) at the center of the [POWER ON/OFF(CHG)] switch to set to “ON”. The camera recorder starts up in Camera mode and is ready for recording.
Basic Shooting Procedures
TOPPreparations
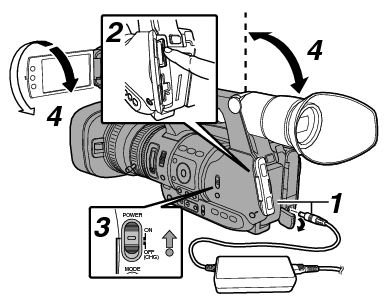
Supply battery or AC adapter power to the camera recorder.
Insert an SD card.
Turn on the power of the camera recorder.
Adjust the angle of the LCD monitor and viewfinder.
Shooting
Configure the video and audio input settings.
You have to configure video settings such as brightness adjustment (iris, gain, shutter) and white balance adjustment in order to start shooting. You also have to adjust the audio input settings and audio recording level for audio recording.
Adjusting the Brightness
Adjusting the White Balance
Adjusting Audio Input Settings and Recording Level
Press the [REC] button to start recording to the SD card.
This camera recorder has three [REC] buttons. Any of the [REC] buttons can be used to start/stop recording by default.
The tally lamp lights up in red during recording.
Zoom Operation
Adjusting the Focus Manually
Memo
If both the slots are loaded with recordable cards in the factory default, pressing the [REC] button starts recording only to the media in the selected slot.
When [Main Menu]  [System] [Record Set] [Slot Mode] is set to “Dual”, recording can be performed simultaneously to the cards in both the slots.
The tally lamp can be turned off in [System]
Check the most recently captured images.
Press the [C.REVIEW/7] button on the lens to activate the Clip Review function. The most recently captured images are played back on the LCD monitor and viewfinder screen.
After playback, the camera recorder returns to standby mode (STBY).
Memo
[Clip Review] is assigned to [C.REVIEW/7] button in factory default.
[Clip Review] can also be assigned to other user buttons.