Adjust the white balance according to the color temperature of the lighting. You can select the adjustment mode according to the shooting conditions.
Adjusting the White Balance
TOPAs the color of the light (color temperature) varies according to the light source, it is necessary to readjust the white balance when the main light source illuminating the subject changes.
Manual White Balance Mode (Manual Switching)
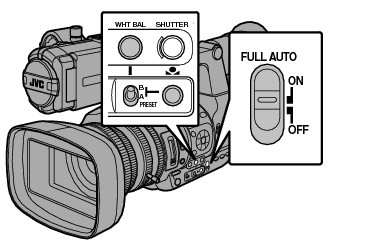
Press the [WHT BAL] button to set to Manual White Balance mode.
You can select the white balance with the [WHT BAL B/A/PRESET] selection switch.
Use the [WHT BAL B/A/PRESET] selection switch to select “PRESET” (preset mode), “A” (memory A mode), or “B” (memory B mode).
The value assigned to the switch appears on the screen.
Memo
This is fixed at “FAW” when the [FULL AUTO] switch of the camera recorder is set to “ON”.
Preset Mode (PRESET)
Two different color temperature settings are registered on this camera recorder. You can switch between them using the [  ] button.
(Default setting: “3200K”  “5600K”)
Press the [ ] button to switch to a different color temperature.
(“Preset Temp.” “Alternative Temp.”)
Set the [WHT BAL B/A/PRESET] switch to “PRESET”.
Press the [ ] button.
] button.Setting the [Preset Temp.] or [Alternative Temp.] Values
You can change both the color temperature settings in the Preset mode in the menu.
Open the [Preset Temp.] or [Alternative Temp.] menu.
Select [Main Menu]  [Camera Process] [White Balance] [Preset Temp.] and [Alternative Temp.], and press the Set button (
  ).
).
The Color Temperature setting screen appears.
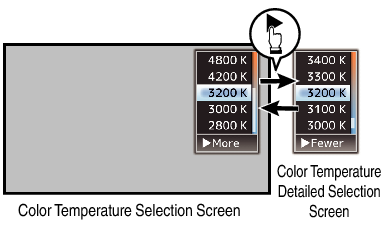
Select the color temperature.
When selecting from a setting value (Color Temperature Selection screen), use the cross-shaped button ( 
 ) to select the color temperature.
[Setting Values: 7500K, 6500K, 5600K, 5200K, 4800K, 4200K, 3200K, 3000K, 2800K]
To select detailed values (Color Temperature Detailed Selection screen)
Press the cross-shaped button (  ) to display the Color Temperature Detailed Selection screen.
Use the cross-shaped button ( ) to select a color temperature.
[Setting Values: 2300K to 15000K (in 100K increments)]
Memo
Use the cross-shaped button ( ) to switch between the Color Temperature Selection screen and the Color Temperature Detailed Selection screen.
If [White Balance] has been assigned to the user button, pressing the assigned user button will display the Color Temperature Selection screen.
Memory A Mode (A), Memory B Mode (B)
Set to the white balance saved in Memory A or Memory B.
When the [WHT BAL B/A/PRESET] selection switch is set to “A” or “B”, press the [ ] button to execute white balance. The white balance will be automatically adjusted and the adjusted value will be saved in Memory A or Memory B.
Prepare the camera recorder.
Set the [POWER ON/OFF(CHG)] switch to “ON”.
Press the [IRIS] button to set to the Auto mode.
Set the [FULL AUTO] switch to “OFF”.
Set the [ND FILTER] switch according to the lighting.
Set the [WHT BAL B/A/PRESET] selection switch to “A” or “B”.
Locate a place with similar lighting conditions as the object to be shot, place a white object near the center of the screen and zoom in to fill the screen with white.
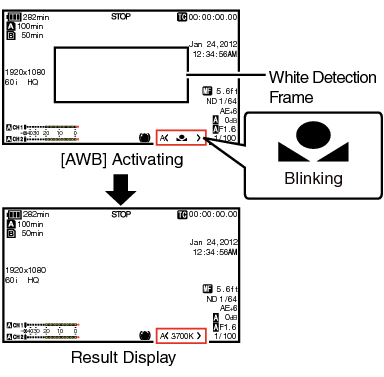
Press the [ ] (Auto White Balance) button.
] (Auto White Balance) button.The white detection frame appears when Auto White Balance is activated. Fill the frame with white completely.
While Auto White is starting up, “A< >” or “B< >” appears on the screen. ( mark appears blinking)
After the correct white balance is obtained, an estimated value of the current color temperature is displayed.
Caution
Do not use highly reflective objects, such as metals. Doing so may result in improper white balance adjustment.
The Auto White function cannot provide optimum white balance with an object outside the adjustment range, for example when it contains only a single color or not enough white color.
Error Message
If the white balance adjustment is not correctly completed, one of the following messages will appear for about 3 seconds.
|
Message |
Status |
|---|---|
|
Auto White *
NG: Object |
Displayed when there is not enough white color on the object, or when the color temperature is not suitable. Use another white object and adjust the white balance again. |
|
Auto White *
Error: Low Light |
Displayed when the lighting is dark. Increase the lighting and adjust the white balance again. |
|
Auto White *
Error: Over Light |
Excessive illumination. Displayed when the lighting is too bright. Decrease the lighting and adjust the white balance again. |
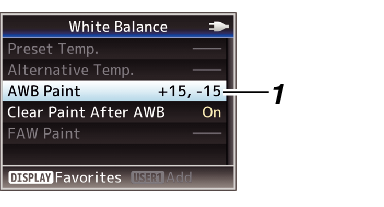
White Paint Adjustment
You can fine-tune the white balance saved in Memory A or Memory B.
Select [Main Menu] [Camera Process] [White Balance] [AWB Paint] and press the Set button ( ).
[Camera Process] [White Balance] [AWB Paint] and press the Set button ( ).The White Paint Adjustment screen appears.
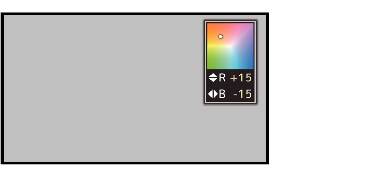
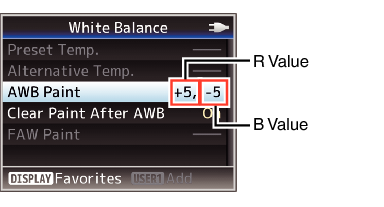
Adjust the R and B values.
Use the cross-shaped button ( ) to adjust R value and (  ) to adjust B value.
Press the Set button ( ).
).Returns to the [White Balance] screen.
Memo
Selecting [ ] will usually clear the White Paint Adjustment value. But when [Main Menu] [White Balance] [Clear Paint After AWB] is set to “Off”, values will not be cleared even when [ ] is selected.
If [White Balance] has been assigned to the user button, pressing the assigned user button will display the AWB Paint Adjustment screen.
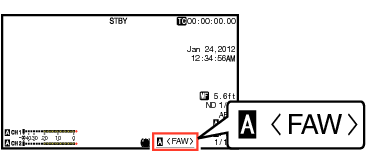
Automatic White Balance Mode (FAW: Fulltime Auto White balance)
Press the [WHT BAL] button on the side control panel to enter into Automatic White Balance mode.
“<FAW>” appears on the screen.
Set the [FULL AUTO] switch on the camera recorder to “ON” to enter Automatic White Balance mode. An appropriate white balance is automatically adjusted according to the color temperature of the lighting on the object.
White balance switching with the [WHT BAL B/A/PRESET] selection switch is disabled.
Caution
The accuracy of [FAW] is inferior to that of Auto White Balance.
When the power of the camera recorder is turned on with the [FAW] mode selected, it takes about 15 seconds for the colors to stabilize.
Memo
When [Main Menu] [Camera Function] [User Switch Set] [AE Lock] is set to “AE/WB”, the white balance when the user button that is assigned [AE Lock] is pressed can be fixed.
If [White Balance] has been assigned to the user button, pressing the assigned user button will display the FAW Paint Adjustment screen.
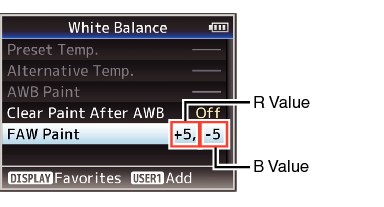
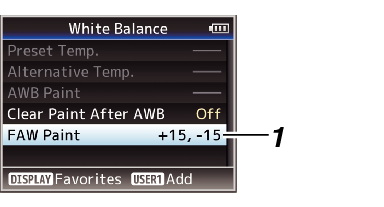
FAW Paint Adjustment
You can fine-adjust the white balance that was automatically adjusted.
Select [Main Menu] [Camera Process] [White Balance] [FAW Paint] and press the Set button ( ).
[Camera Process] [White Balance] [FAW Paint] and press the Set button ( ).The FAW Paint Adjustment screen appears.
Adjust the R and B values.
Use the cross-shaped button ( ) to adjust R value and ( ) to adjust B value.
Press the Set button ( ).
).Returns to the [White Balance] screen.