Upload clips recorded in the SD card to a preset FTP server.
All playable clips on the thumbnail screen can be uploaded.
Uploading Video Clip
TOPUploading a Video Clip
Set the camera recorder to the Media mode.
Press and hold the [MODE] selection button in Camera mode to enter Media mode. A thumbnail screen of the clips recorded on the SD card is displayed.
You can upload the selected clips on the thumbnail screen to the FTP server.
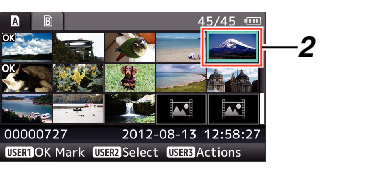
Move the cursor to the clip to be uploaded.
Move the cursor to the clip to be uploaded using the cross-shaped button ( 


 ).
).
Press the [LOLUX/3] button.
The action selection screen is displayed.
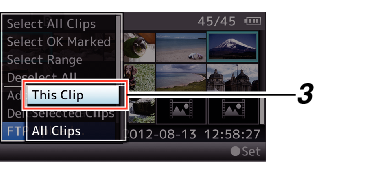
Select [FTP Upload]  [This Clip] server to upload to, and press the Set button (
  ).
).
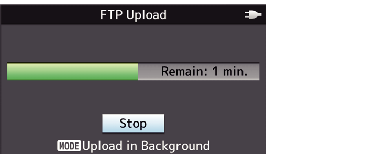
[This Clip] server to upload to, and press the Set button ( ).The status of the transfer process is indicated by a progress bar.
Memo
The name for the server to upload files to are indicated using the preset names in [Clip Server] [Alias].
To stop uploading, press the Set button ( ).
Select [Yes] on the confirmation screen, and press the Set button ( ) to stop uploading and return to the thumbnail screen.
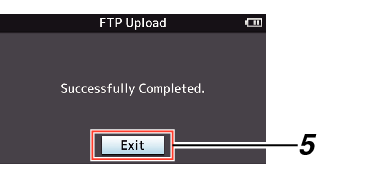
Upload is complete.
After upload is complete, “Successfully Completed.” appears on the screen.
Press the Set button ( ) to return to the thumbnail screen.
Selecting and Uploading Multiple Clips
To select and upload multiple clips, refer to “Selecting and Performing Operations on Multiple Clips ”.
Uploading All Video Clips
You can upload all displayed clips or all clips that are appended with an OK mark.
You can upload all displayed clips or all clips that are appended with an OK mark.
Press the [LOLUX/3] button.
The action selection screen is displayed.
Upload the clips.
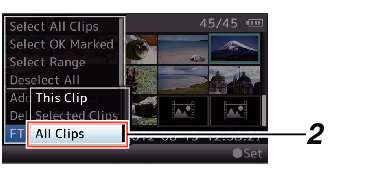
Select [FTP Upload...] [All Clips] server to upload to, and press the Set button ( ).
Upload starts.
The status of the transfer process is indicated by a progress bar.

Memo
To stop uploading, press the Set button ( ).
Select [Yes] on the confirmation screen, and press the Set button ( ) to stop uploading and return to the thumbnail screen.
If the file to be uploaded has the same name as an existing file in the FTP server, an overwrite confirmation window appears.
When “HTTP” is selected in the [Select FTP Proxy] screen of the network connection setting, the overwrite confirmation window will not be displayed and the existing file is overwritten.
Even after upload has started (FTP transfer in progress) in step  , pressing the [MODE] button switches the camera recorder to the Camera mode, allowing you to start shooting.
If a setting other than “FTP” is specified for [Protocol], to ensure the safety of the communication path, a screen appears prompting you to validate the fingerprint of the public key and certificate received from the server.
Check to ensure that the displayed value coincides with the known value.
Fingerprint is a unique value that varies with each public key and certificate.
For details of the fingerprint, please consult the administrator of the server to be connected.
When “HTTP” is selected in the [Select FTP Proxy] screen of the network connection setting, connections to the servers other than “FTP” protocol cannot be made.
Upload is complete.
After all clips are uploaded successfully, “Successfully Completed.” is displayed.
Press the Set button ( ) to return to the thumbnail screen.
When clips are not uploaded successfully, the following errors are displayed.

Memo
If there is an error message or other notifications when you switched to the Camera mode while FTP upload is in progress, a  icon (yellow) will appear in the remaining media space display area in the Camera mode.
You can press the [MODE] button to switch to the Media mode and display the above error screen.
Follow “List of FTP Transfer Errors ” to clear the error display.