Step4 IP Address Setting for the Camera
TOP
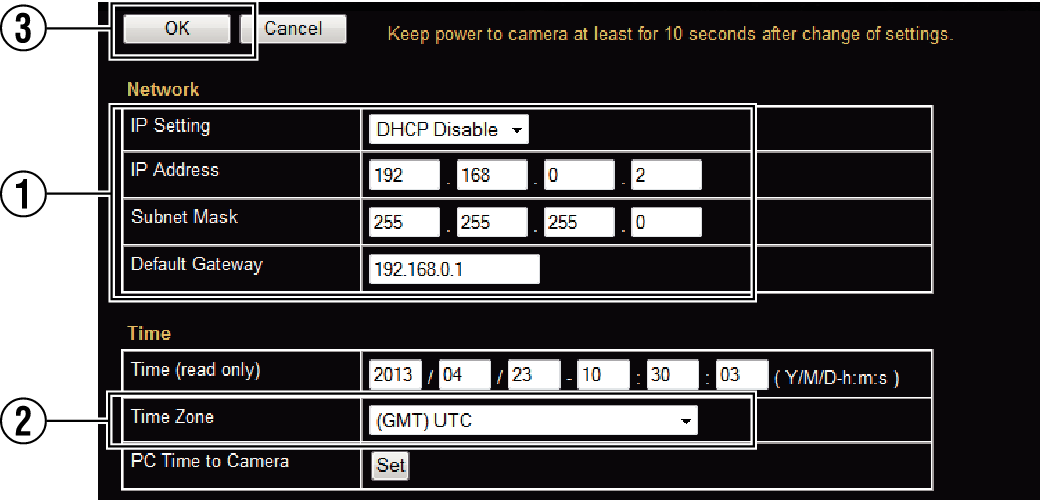
When selecting “DHCP Disable”:
Select “DHCP Disable” for the [Network] option. Then, enter required values in [IP Address], [Subnet Mask], and [Default Gateway].
When selecting “DHCP Enable”:
The default setting is “DHCP Disable” (DHCP client function is disabled). To assign an IP address from the DHCP server, connect the DHCP server to the LAN, set the [Network] of the camera to “DHCP Enable”, and click the [OK] button.
For details on IP addresses assigned to the camera, consult your network administrator.
Set the DHCP server such that the same IP address is always assigned to the MAC address of the camera by the DHCP server. Connection may fail if the above setting is not performed.
For information on the network settings, please consult your network administrator.
If you enter the following URL directly into the address bar of Internet Explorer, you can open the [Basic Setting1] page after logging in as “admin” in 2 of Step 3 without going through the Built-in Viewer.
Example: http://192.168.0.2/cgi-bin/display.cgi?basicmenu1.html
After the [Security Settings] screen appears, click the [YES] button to proceed.
The camera restarts using the new IP address. The camera takes about 1 minute to restart.
Access from this computer may fail when the IP address of the camera is changed. If you access the camera from the same PC, set the IP address of the PC accordingly.
If the display or configuration of the open window appears strange
Check the PC settings as follows: