-

- Recording
-
Taking Videos in Auto Mode
Taking Videos in Auto Mode
During Auto recording, the camera automatically adjusts the settings such as brightness and focus to suit the shooting conditions.
Before recording an important scene, it is recommended to conduct a trial recording.
Open the LCD monitor.
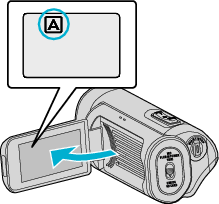
Check if the recording mode is set to  .
.
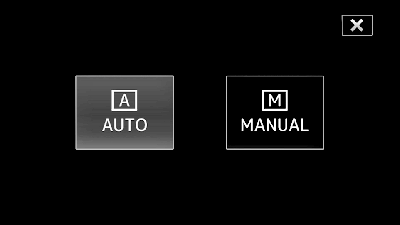
If the mode is ![]() Manual, tap
Manual, tap ![]() on the recording screen to display the mode switching screen.
on the recording screen to display the mode switching screen.
Tap to switch the recording mode.
Press the START/STOP button to start recording.
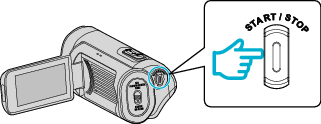
Press again to stop.
Some displays disappear after approximately 3 seconds.
Use the  button to change the displays.
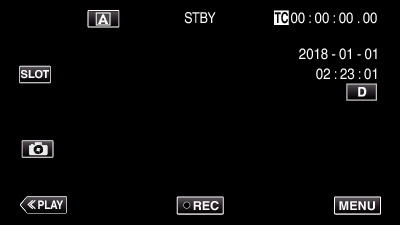
Indications for Video Recording
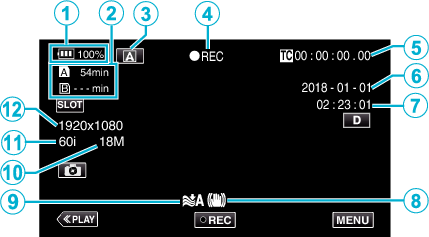
Display Icon |
Description |
|
|---|---|---|
|
|
Battery Indicator |
Displays the approximate remaining battery power during use. |
|
|
Recording Media |
Displays the SD card icon and recordable time. |
|
|
Recording Mode |
Displays the current recording mode as Current shooting mode is displayed. |
|
|
Recording |
Appears when recording is in progress. (“STBY” appears when recording is stopped.) |
|
|
Time Code |
Displays the time code that is recorded to a video. |
|
|
Date Display |
Displays the date (year, month and day). |
|
|
Time |
Displays the current time. |
|
|
DIS |
Displays the image stabilizer settings. |
|
|
Wind Cut |
Displays the wind cut settings. |
|
|
Bit Rate |
Displays the bit rate settings. |
|
|
Frame Rate |
Displays the frame rate settings. |
|
|
Resolution |
Displays the resolution that is determined according to the “System” of the recording format. |


Operation Buttons for Video Recording
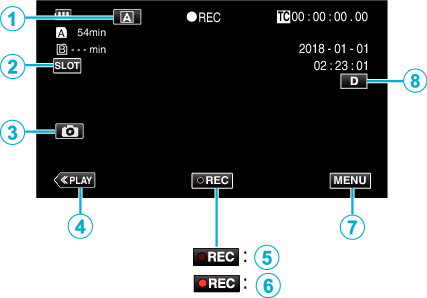
Operation Buttons |
Description |
|
|---|---|---|
|
|
Auto/Manual Selection Button |
Switches between the Auto and Manual recording modes. |
|
|
Card Slot Selection Button |
Switches the card slot to use between Slot A and Slot B. |
|
|
Still Image Recording Button |
Tap this button to record a still image during recording standby. |
|
|
Playback Mode Button |
Switches to the playback mode. |
|
Recording Start/Stop Button |
Functions as the START/STOP button. |
|
|
Menu Button |
Displays the main menu. |
|
|
Display Button |
Switches the display between full ( Simple display: Some displays disappear automatically when the screen is not operated. Full display: Displays everything. The display button changes from When the power is turned off, the display setting will revert to simple display ( |
 ) and simple (
 Caution
Do not expose the lens to direct sunlight.
While this unit can be used with the LCD monitor reversed or the LCD monitor closed with “LCD CLOSED RECORDING” activated, the temperature of this unit rises more easily. Leave the LCD monitor open when using this unit for long periods of time, or in places exposed to direct sunlight or high temperatures.
The power may turn off to protect the circuit if the temperature of this unit rises too much.
This unit is a microcomputer-controlled device. Electrostatic discharge, external noise and interference (from a TV, a radio, etc.) might prevent it from functioning properly. In such a case, close the monitor screen to turn off the power and remove the AC adapter, then press the Reset button to reset this unit.
Disclaimer
We shall not be liable for any loss of recorded contents when videos or audio cannot be recorded or played back properly due to malfunction of this unit and accessories that come with it or the SD card.
Recorded contents (data) that are lost, including loss due to malfunction of this unit, cannot be restored. Please be forewarned.
JVC will not be responsible for any lost data.
Memo
Check that the remaining recording time in the media is sufficient before you start recording. Checking the Remaining Battery Level and Recording Time
If the remaining recording time is not sufficient, save the files on a PC or disc before deleting the files from the unit. Deleting Unwanted Files
Due to the specifications of this unit, continuous recording for a duration of 12 hours or longer is not possible when recording is performed with “System” set to “HD”. Recording stops automatically 12 hours after it is started.
(It may take some time to resume recording.)
Up to 4GB per video file can be recorded. File recorded using long recordings that exceeds 4GB is split and recorded into several video files. However, recording up to 64 GB or 4 hours is possible when “4 GB Spanning” is set to “Off (SDXC)” (This is configurable only when “System” is set to “4K” or “High-Speed”, and when an SDXC card is used.)
Depending on the shooting conditions, the four corners of the screen may appear dark, but this is not a malfunction. In this case, change the shooting conditions by moving the zoom lever, etc.