-

- Using Wi-Fi
- How to Establish a Wi-Fi Connection
-
Connecting
Connecting
Direct Connection
This mode of connection enables direct access to the web functions of this camera from devices such as a smartphone, tablet terminal or PC.
(Operation on this camera)
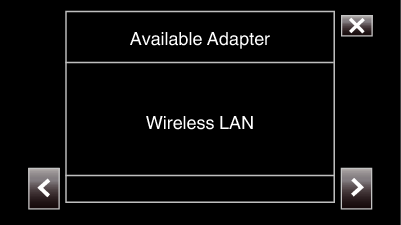
Launch the wizard screen and tap  .
.
Starting up the wizard screen ( Preparation on the Camera )
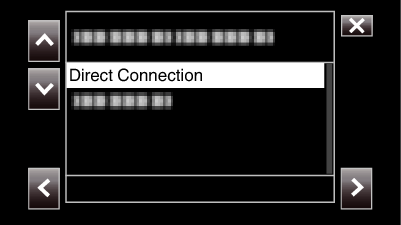
Select “Direct Connection” and tap .
Follow the screen instructions to complete setting.
Configure the settings for the following.
Configuration method
* Configuration of SSID and passphrase in the case of manual configuration.
If there is no need to alter the displayed SSID and passphrase, write down the information and tap the button.
To proceed to the next step, tap . To return to the previous step, tap  .
.
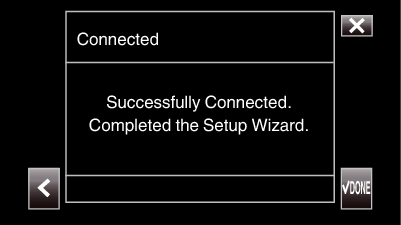
Tap  DONE at the lower right of the screen.
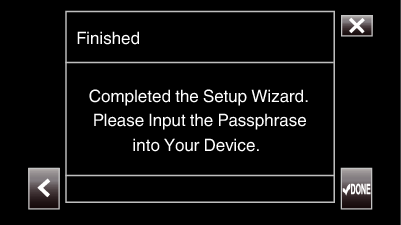
* Screen when “Manual” is selected and configuration is complete.
When “WPS” is selected on the “Select Setup Type” screen, the following steps 4 and 5 are not required.
Tap “STATUS”.
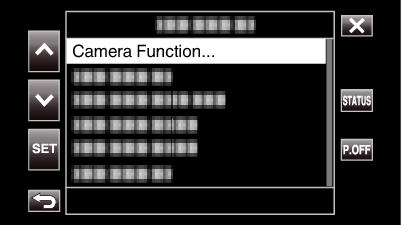
Tap to display the “Network” screen.
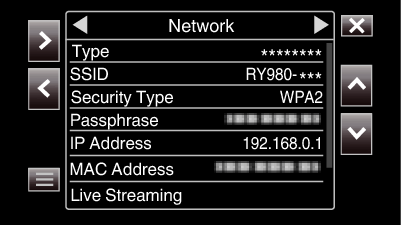
Check to ensure that the “SSID” and “Passphrase” that you have configured in the wizard are displayed.
(Operation on a smartphone, tablet terminal or PC)
Display the list of access points in the wireless connection settings and select “RY980-xxxxxx”.
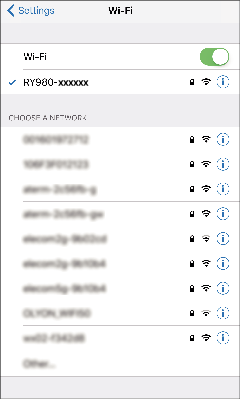
xxxxx varies with the device used.
A password confirmation screen appears.
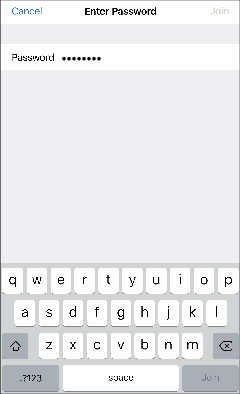
Enter the “Passphrase” displayed on the “Network” screen in Step 5.
Access the camera via a web browser on devices such as a smartphone, tablet terminal or PC
Display the “MENU”  “STATUS” “Network” screen.
Check the displayed IP address.
(Operation on a smartphone, tablet terminal or PC)
Start up the web browser on the terminal you wish to connect to the camera, enter the “IP Address” that you have verified in Step 1 into the address field and confirm the entry.

If “192.168.0.1” is displayed in “IP Address”, enter “http:// 192.168.0.1”.
A login screen appears.
Enter the user name (jvc) and password (default value: 0000) and confirm the input.
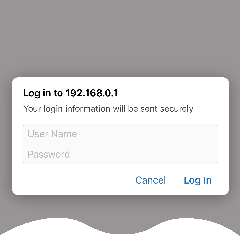
The main page of the camera is displayed.
Memo
The password can be changed in “MENU” ![]() “System”
“System” ![]() “Network”/“Settings”
“Network”/“Settings” ![]() “Web”
“Web” ![]() “Login Password”.
“Login Password”.
Connection via an Access Point
Internet Connection
This mode of connection enables access to the web functions of this camera via the Internet from devices such as a smartphone, tablet terminal or PC.
To use this function, it is necessary to get ready a wireless LAN router compatible with UPnP (Universal Plug and Play) and an Internet connection that allows a global IP address to be acquired.
Use a wireless LAN router that supports UPnP.
(Products that come with a Wi-Fi certification logo)
To check whether UPnP is supported, please refer to the instruction manual of the wireless LAN router in use.
Memo
Depending on the wireless LAN router in use and signal strength, you may experience connection problems or slow connections.
When operating the zoom function using a smartphone, the response may be slower compared to using the camera.
Obtaining a Dynamic DNS (DDNS) Account
By obtaining a dynamic DNS account, this unit may be used on the web as usual even if the IP address changes when making an access to this unit via the Internet.
Only the JVC Dynamic DNS service can be configured on this camera.
To obtain (register) an account, perform the following steps.
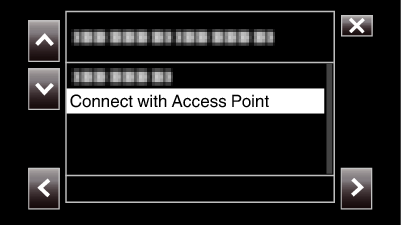
Connection Adapter Settings and Camera Connection
Select “Connect with Access Point”, followed by tapping .
Select “Internet connection”, followed by tapping .

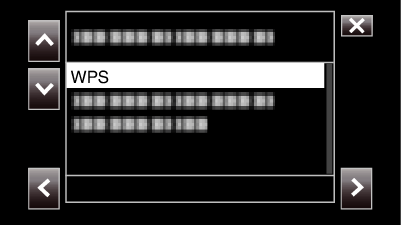
Select the method of configuration and tap .
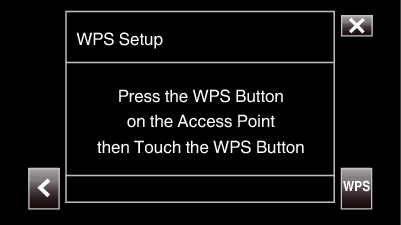
Configure WPS here.
Press the WPS button on the access point.
For more information, please refer to the instruction manual of the access point.
Tap “WPS”.
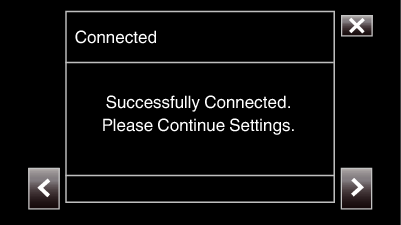
A connection successful screen appears.
Follow the instructions on the screen to configure “HTTP Port”/“UPnP”/“DDNS”/“Username”/“Password”.
HTTP Port:
Configure the port number for connecting to the Internet. This is usually set to “80”.
UPnP:
Set to “On” if the UPnP protocol can be used to connect the device to the network.
DDNS:
Configure the environment for connecting to the Internet. This is usually set to “On”.
Username:
Configure a user name for the acquired DDNS account.
Password:
Configure a password for the acquired DDNS account.
For non-WPS, information such as SSID, type of encryption, passphrase and IP address (“DHCP” or “Manual”) also need to be configured.
Memo
It is also possible to configure the connection settings in the “Settings” tab after direct connection is established and upon access to the main page of the camera via the web browser. Changing Connection Settings
Access the camera via a web browser on devices such as a smartphone, tablet terminal or PC
Check the URL in “MENU” “STATUS” “URL(WAN)” of the camera.
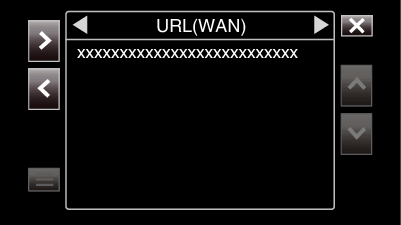
Start up the web browser on devices such as a smartphone, tablet terminal or PC and access the verified URL.
Enter the user name and password.
Upon entering the user name (jvc) and password (default value: 0000) on the login screen, the main page of the camera is displayed.
Local Area Network (LAN) Connection
This mode of connection enables access to the web functions of this camera from devices such as a smartphone, tablet terminal or PC that is within the same Local Area Network (LAN).
Connection Adapter Settings and Camera Connection
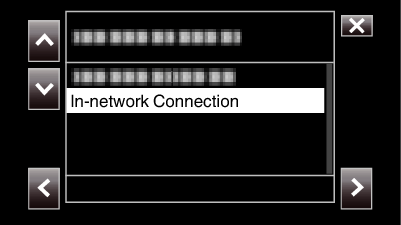
Select “Connect with Access Point”, followed by tapping .
Select “In-network Connection”, followed by tapping .
Select the method of configuration and tap .
Configure WPS here.
Press the WPS button on the access point.
For more information, please refer to the instruction manual of the access point.
Tap “WPS”.
A connection successful screen appears.
For non-WPS, information such as SSID, type of encryption, passphrase and IP address (“DHCP” or “Manual”) also need to be configured.
Memo
It is also possible to configure the connection settings in the “Settings” tab after direct connection is established and upon access to the main page of the camera via the web browser. Changing Connection Settings
Access the camera via a web browser on devices such as a smartphone, tablet terminal or PC
Connect a smartphone, tablet terminal or PC to a Local Area Network.
This setting is not required if the smartphone, tablet terminal or PC is already connected to the Local Area Network.
Display the “MENU” “STATUS” “Network” screen.
Check the displayed IP address.
(Operation on a smartphone, tablet terminal or PC)
Start up the web browser on the terminal you wish to connect to the camera, enter the “IP Address” that you have verified in Step 2 into the address field and confirm the entry.
If “192.168.0.1” is displayed in “IP Address”, enter “http:// 192.168.0.1”.
A login screen appears.
Enter the user name (jvc) and password (default value: 0000) and confirm the input.
The main page of the camera is displayed.
Memo
The password can be changed in “MENU” ![]() “System”
“System” ![]() “Network”/“Settings”
“Network”/“Settings” ![]() “Web”
“Web” ![]() “Login Password”.
“Login Password”.