You can connect a device such as a smartphone, tablet terminal, or PC to the camera recorder using an Ethernet hub to access the camera recorder’s web functions. Alternatively, you can also connect directly using a cross cable.
Connecting via Wired LAN
TOPAttach the Ethernet adapter to the [HOST] terminal on the camera recorder, then connect to the smartphone, tablet terminal, or PC with an Ethernet hub or a cross cable.
Perform setting on the camera recorder, and start up the [Wizard] screen.
[Ethernet] appears on the [Wizard] screen.
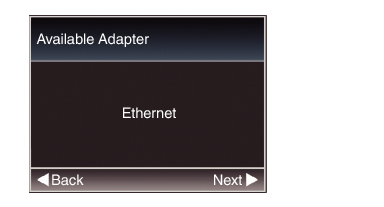
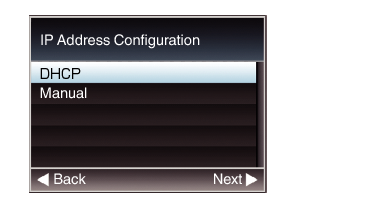
Press the  button to display the [IP Address Configuration] screen.
button to display the [IP Address Configuration] screen.Follow the screen instructions to complete setting. Perform setting for the following.
IP address setting method (DHCP or manual)
IP Address
Subnet Mask
Gateway
DNS Server
Setting is complete.
After setting is complete, you can access the camera recorder via a web browser.


