To configure the setting, go to [TC/UB]  [Drop Frame].
Setting Time Code Generator
TOPPresetting the Time Code
Time code and user’s bit data generated from the internal time code generator are recorded.
This section describes how to set [TC/UB] [TC Preset].
Memo
When the frame rate in [Main Menu] [System] [Record Set] [Record Format] [  Frame & Bit Rate]/[
  Frame & Bit Rate] is set to “50p”, “50i”, “25p” or “24p”, setting to “Drop” is disabled.
You can configure the setting without accessing the [TC/UB] menu screen.
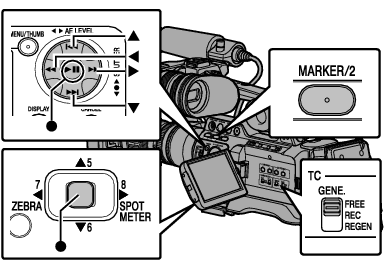
Required Settings Before Preset

Set the [TC GENE.] switch to “REC” or “FREE”.
[REC]:
Preset data in the time code generator operates in run mode during recording mode. Set this when recording continuous time code in connecting frames.
[FREE]:
Time code starts to operate in run mode from the preset time in the time code generator.
Select the framing mode for the time code generator (only when the frame rate setting is “60” or “30”).
[Drop]:
Sets the run mode of the time code generator to drop frame mode. Use this setting when placing emphasis on the recording time.
[Non Drop]:
Sets the run mode of the time code generator to non-drop frame mode. Use this setting when placing emphasis on the number of frames.
Memo
Drop frame/non-drop frame mode
When the frame rate setting in [Main Menu] [System] [Record Set] [Record Format] [Frame & Bit Rate] is “60p”, “60i”, or “30p”, the actual number of frames per second is approximately 59.94 (29.97). However, the time code processing standard is “60p”, “60i”, or “30p” frames. To make up for the frame number discrepancy, the drop frame mode (Drop) drops the 00 frame and 01 frame every minute except for minutes that are multiples of 10. However, in the case of “60p”, the 00, 01, 02 and 03 frame are dropped.
The non-drop frame mode (Non Drop) does not drop frames and ignores the discrepancy with the actual time.
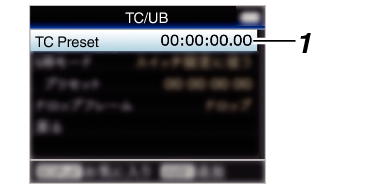
Presetting the Time Code
Select [TC/UB] [TC Preset] and press the Set button (  ).
).
[TC Preset] and press the Set button ( ).The [TC Preset] screen appears.
Memo
When the [TC GENE.] switch is set to “REGEN”, the parameter is displayed as “Regen” and selection is disabled.
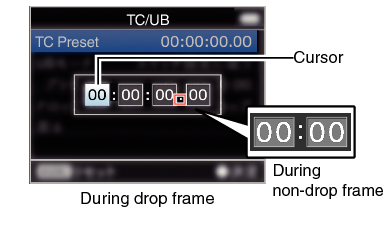
Set the time code (hour, minute, second, frame).
Use the cross-shaped button ( 
 ) to place the cursor at the item to set, then use the cross-shaped button (
 ) to change the values.
Memo
Press the [MARKER/2] button to reset each digit to “0”. The cursor moves to the time digit (left).
Check the values and press the Set button ( ).
).The time code is set and the screen returns to [TC/UB].
To cancel the setting, press the [CANCEL] button.
Press the [MENU/THUMB] button.
Returns to the normal screen.
Setting Time Code without Opening the Menu
Memo
Settings cannot be made in the following cases.
When the [TC GENE.] switch is set to “REGEN”.
Menu screen is displayed.
The camera recorder is not in the Camera mode.
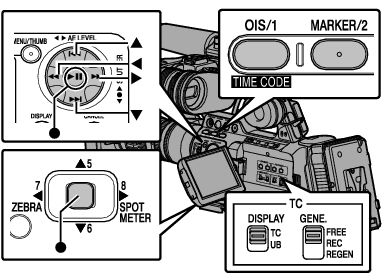
Setting Time Code
Set the [TC DISPLAY] switch on the LCD monitor to “TC”.
Set the [TC GENE.] switch to a setting other than “REGEN”.
Hold down the [MENU/THUMB] button and press the [OIS/1] button.
The [TC Preset] setting screen appears.

Set the time code (hour, minute, second, frame).
Use the cross-shaped button ( ) to place the cursor at the item to set, then use the cross-shaped button ( ) to change the values.
Memo
Press the [MARKER/2] button to reset each digit to “0”. The cursor moves to the time digit (left).
Check the values and press the Set button ( ).
).The time code is set and the screen returns to the normal screen.
To cancel the setting, press the [CANCEL] button.
Caution
When the camera recorder is switched to Media mode during editing, editing will be canceled and the screen will close.
When editing the time code, operation of the [OIS/1] and [MARKER/2] buttons that are set in [Main Menu] [Camera Function] [User Switch Set] is disabled. [MARKER/2] functions as the number reset button.
Recording Time Code in Continuation of the Recorded Time Code on SD Card
This camera recorder is equipped with the time code reader.
Set the [TC GENE.] switch to “REGEN”.
When the camera recorder enters from recording standby mode to recording mode, it reads the time code already recorded on the SD card and records the new time code in continuation of that value.
The same data as the user’s bit already recorded on the SD card is recorded.
Memo
When the [TC GENE.] switch is set to “REGEN”, the framing mode of the time code follows the settings in [TC/UB] [Drop Frame] instead of the clip settings.


