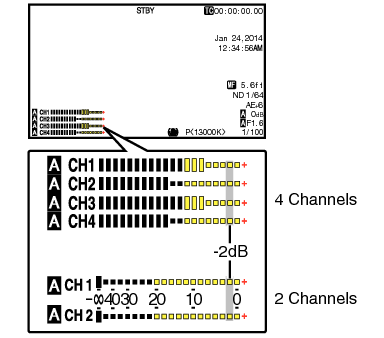
You can record audio from the four channels (CH-1/CH-2/CH-3/CH-4) in synchronization with the video images on this camera recorder.
Audio Recording
TOPSelect from the three options below to record the audio.
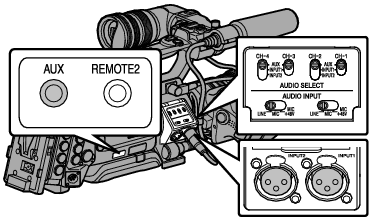
Microphone connected to [AUX] terminal
Microphone connected to [INPUT1] terminal
Microphone connected to [INPUT2] terminal
Setting the Number of Recording Channels
Set accordingly for slot A and slot B.
Set the number of recording channels in [Main Menu]  [System] [Record Set] [Record Format] [
  Audio]/[
  Audio].
Selecting Audio to Be Recorded in Each Channel
Select the audio to be recorded in CH-1/CH-2/CH-3/CH-4.
|
- |
Switch Setting |
Audio Input |
|---|---|---|
|
CH-1 |
AUX |
Audio input from [AUX] terminal |
|
INPUT1 |
Audio input from [INPUT1] terminal |
|
|
CH-2 |
AUX |
Audio input from [AUX] terminal |
|
INPUT1 |
Audio input from [INPUT1] terminal |
|
|
INPUT2 |
Audio input from [INPUT2] terminal |
Memo
Set the reference input level of “AUX” using [Main Menu] [A/V Set] [Audio Set] [AUX Gain].
Setting for [INPUT1]/[INPUT2] Input Channel
Set [AUDIO INPUT] signal selection switch 1 or 2 according to the devices to be connected to the [INPUT1] and [INPUT2] terminals.
|
Setting |
Description |
|---|---|
|
[LINE] |
Use this setting when connecting to an audio device or other equipment. The reference input level is +4 dBu. |
|
[MIC] |
Use this setting when connecting to a dynamic microphone. |
|
[MIC+48V] |
Use this setting when connecting to a microphone (phantom microphone) that requires a +48 V power supply. |
Memo
When “MIC” or “MIC+48V” is selected, set the reference input level in [A/V Set] [Audio Set] [Input1 Mic Ref.]/[Input2 Mic Ref.].
Caution
When connecting a device that does not require a +48 V power supply, make sure that it is not set to the “MIC+48V” position.
When the [AUDIO INPUT] signal selection switch 1 or 2 is set to “MIC”, check to ensure that a microphone is connected to the [INPUT1]/[INPUT2] terminal. If you increase the recording level when a microphone is not connected, noise from the input terminal may be recorded.
When a microphone is not connected to the [INPUT1]/[INPUT2] terminal, set the [AUDIO INPUT] signal selection switch 1 or 2 to “LINE”.
Adjusting Audio Recording Level
You can select to adjust the audio recording levels for each of the four channels (CH-1/CH-2/CH-3/CH-4) manually or automatically.
Set CH-1/CH-2 using the switch, and CH-3/CH-4 using the menu.
For CH-1/CH-2
 Adjusting manually
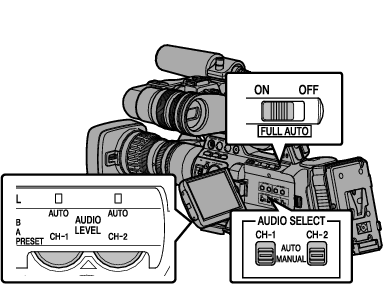
Set the [AUDIO SELECT CH-1/CH-2 AUTO/MANUAL] selection switch to “MANUAL” for the channel to be adjusted manually.
Turn the [AUDIO LEVEL CH-1/CH-2] adjustment knob corresponding to the channel to adjust the level.
When [Audio Set] [CH1 Limiter]/[CH2 Limiter] [Threshold Level] is set to “Off”, adjust such that the audio level meter does not light up at -2 dB even for loud sounds.
Memo
For the recorded audio, you can set items such as [Threshold Level], [Attack Time] or [Decay Time] in [CH1 Limiter] or [CH2 Limiter].
If [CH1 Limiter]/[CH2 Limiter] [Threshold Level] is set to a value other than “Off”, the limiter operates according to the value set.
You can adjust the level manually during the recording, recording standby, and stop modes.
Set the reference audio level of [CH-1] and [CH-2] to be recorded on SD cards in the [Main Menu] [A/V Set] [Audio Set] [CH1/2 Ref. Level] menu to “-20dB”, “-18dB”, or “-12dB”. (common for CH-1/CH-2)
Adjusting automatically
Set the [AUDIO SELECT CH-1/CH-2 AUTO/MANUAL] selection switch to “AUTO” or the [FULL AUTO] switch to “ON” to enter Automatic Adjustment mode. The audio recording level is set automatically according to the input level.
Memo
When the [FULL AUTO] switch is set to “ON”, mode switching of the [AUDIO SELECT CH-1/CH-2 AUTO/MANUAL] selection switch is disabled.
When [Main Menu] [A/V Set] [Audio Set] [CH1 Limiter]/[CH2 Limiter] [Threshold Level] is set to “Off” while in the automatic adjustment mode, the limiter operates at -6dBFS.
If [CH1 Limiter]/[CH2 Limiter] [Threshold Level] is set to a value other than “Off”, the limiter operates according to the value set.
When [Main Menu] [Camera Function] [FULL AUTO] [Audio] is set to “SW Set”, you can switch the audio recording mode with the [AUDIO SELECT CH-1/CH-2 AUTO/MANUAL] selection switch on the camera recorder even when the [FULL AUTO] switch is set to “ON”.
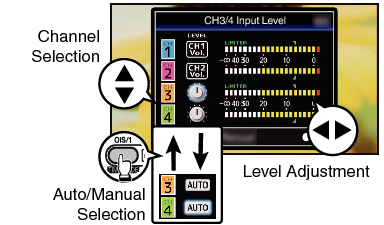
For CH-3/CH-4
Open the [CH3/4 Input Level] adjustment screen.
Press the Set button (  ) in [Main Menu] [A/V Set] [Audio Set] [CH3/4 Input Level].
The [CH3/4 Input Level] adjustment screen appears.
Memo
The input level cannot be set when the [FULL AUTO] switch is set to “ON”.
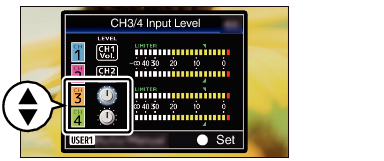
Select whether to adjust manually or automatically.
Use the 
 cross-shaped buttons to select the channel to set.
Press the [OIS/1] button to switch between Manual and Auto.
During manual adjustment, adjust the level using the 
 cross-shaped buttons.
Press the Set button ( ) to end the adjustment.
) to end the adjustment.Make sure to press the Set button ( ) to save the setting.
Pressing the [CANCEL] button discards the setting and returns to the menu screen at the next higher level.
Memo
You can adjust the level manually during the recording, recording standby, and stop modes.
For the recorded audio, you can set items such as [Threshold Level], [Attack Time] or [Decay Time] in [CH3 Limiter] or [CH4 Limiter].
If [CH3 Limiter]/[CH4 Limiter] [Threshold Level] is set to a value other than “Off”, the limiter operates according to the value set.
Set the reference audio level of [CH-3] and [CH-4] to be recorded on SD cards in the [Main Menu] [A/V Set] [Audio Set] [CH3/4 Ref. Level] menu to “CH1/2 Link”, “CH1/2 -6dB”, or “CH1/2 -12dB”. (common for CH3/CH4)
When [Main Menu] [A/V Set] [Audio Set] [CH3 Limiter]/[CH4 Limiter] [Threshold Level] is set to “Off” while in the automatic adjustment mode, the limiter operates at -6dBFS.
If [CH3 Limiter]/[CH4 Limiter] [Threshold Level] is set to a value other than “Off”, the limiter operates according to the value set.


